Warning
This documentation is actively being developed and links may change.
Android User Guide
This guide assumes you've already read and followed the Getting Started guide. If not, we strongly recommend beginning there first before proceeding.
Warning
This guide is out-dated and the setup process have been changed since Fuse Android 0.9.0.
Prerequisites
The following software is required:
Note
Some of the software is embedded in Android Studio, but is required when using scripts and other command line tools outside of Android Studio.
Note
If you already have Android Studio installed with SDK Platform, SDK Tools and the emulator configured, feel free to skip down to Create an Android Project.
Installing Android SDK Platform and Tools
Once Android Studio is finished downloading and installing we will need to setup additional tools available through Android Studio's SDK Manager.
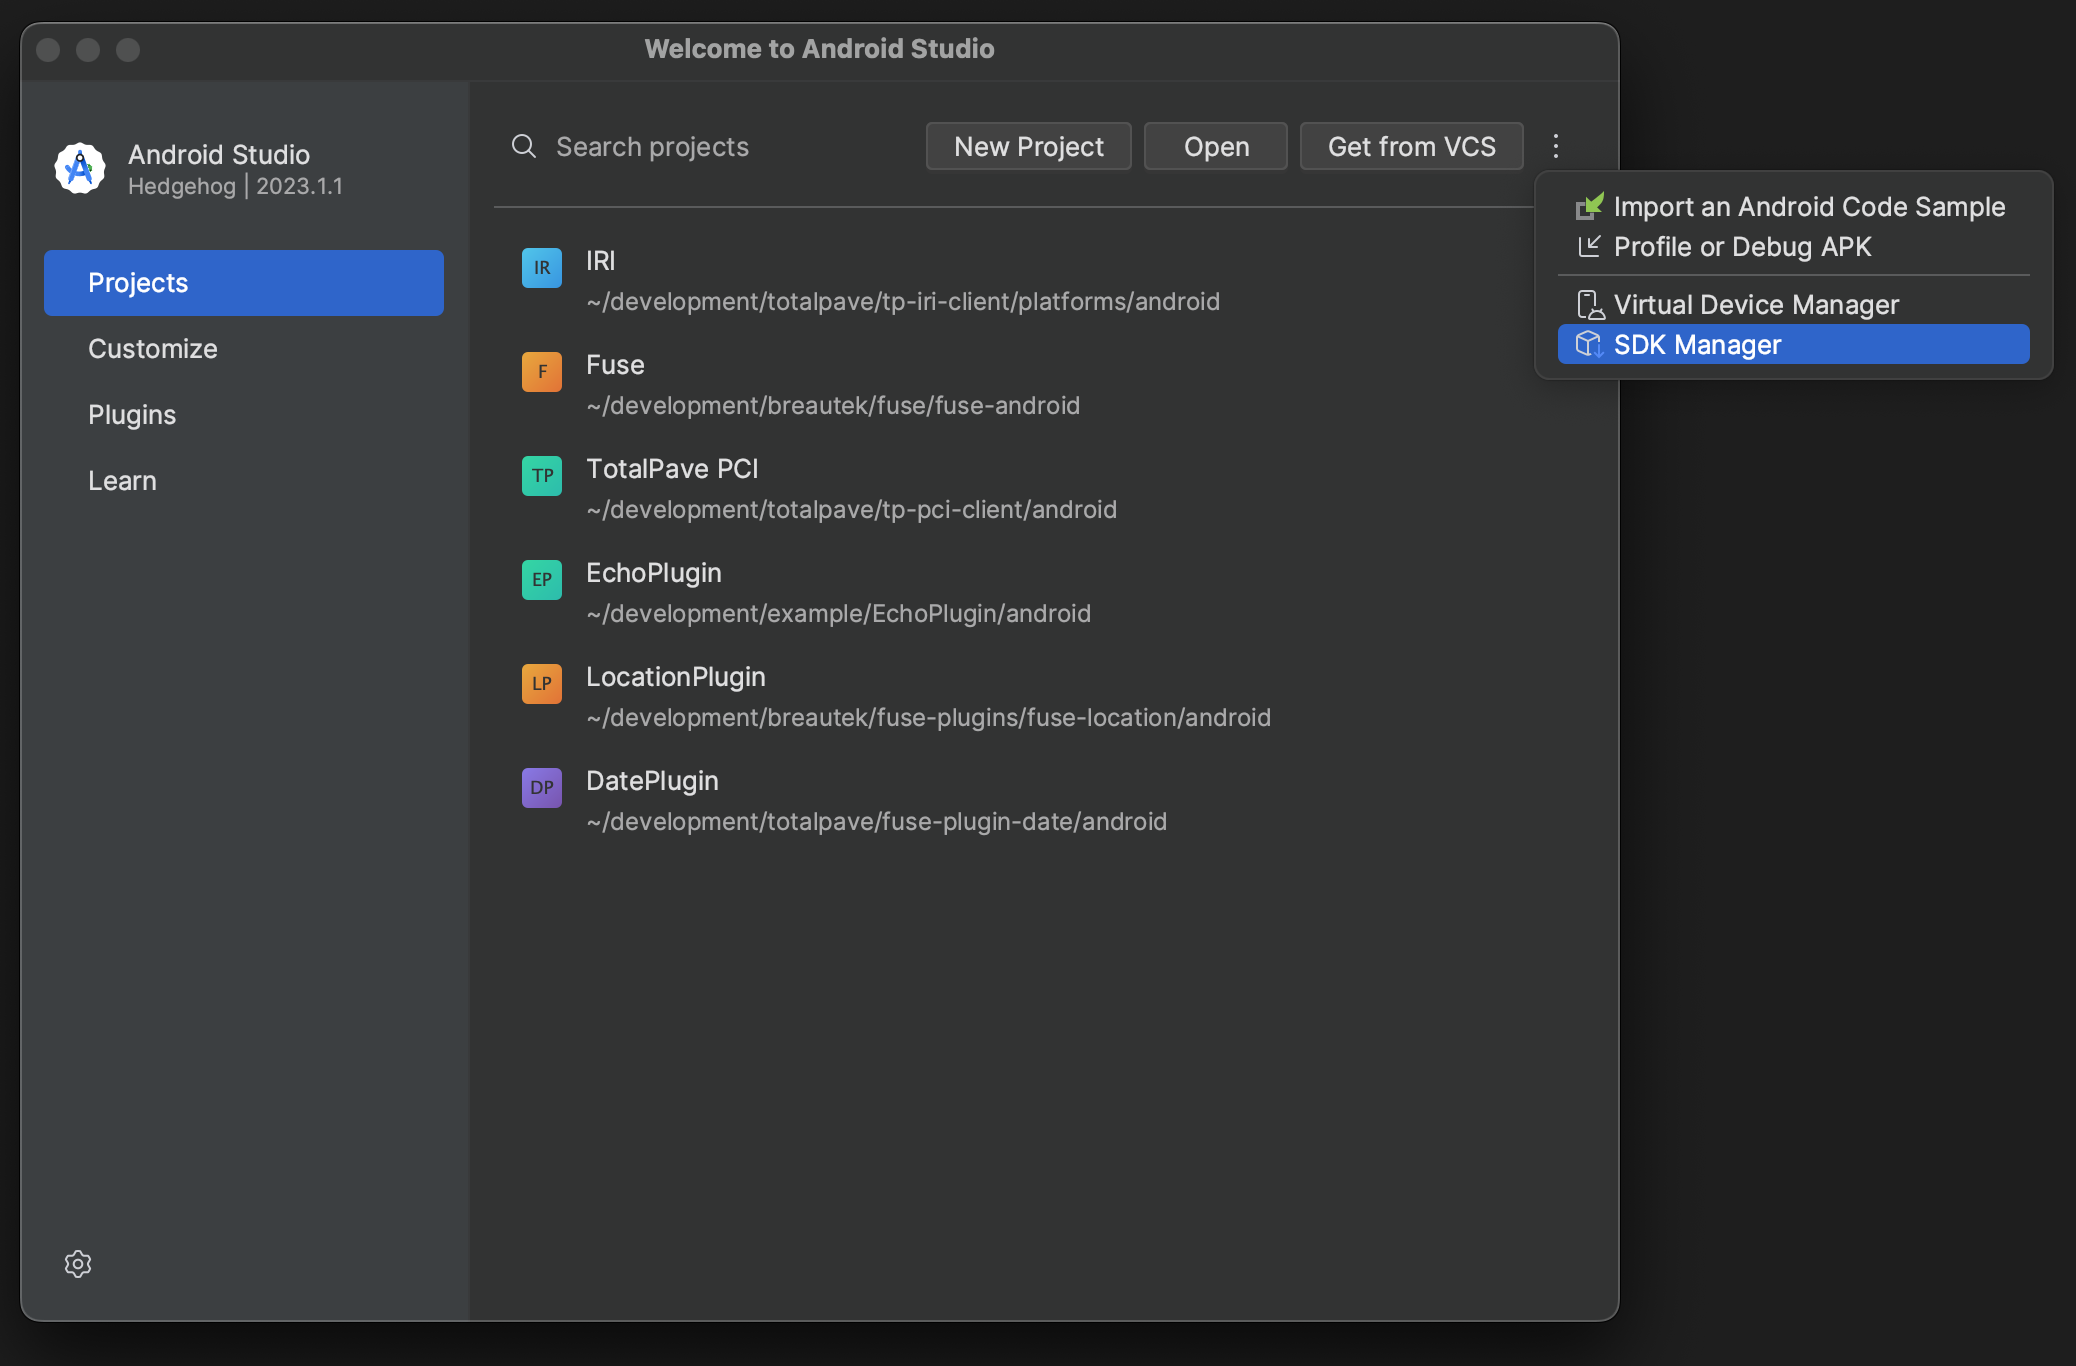
While in the Welcome to Android Studio screen, click on the triple dot and go to SDK Manager.
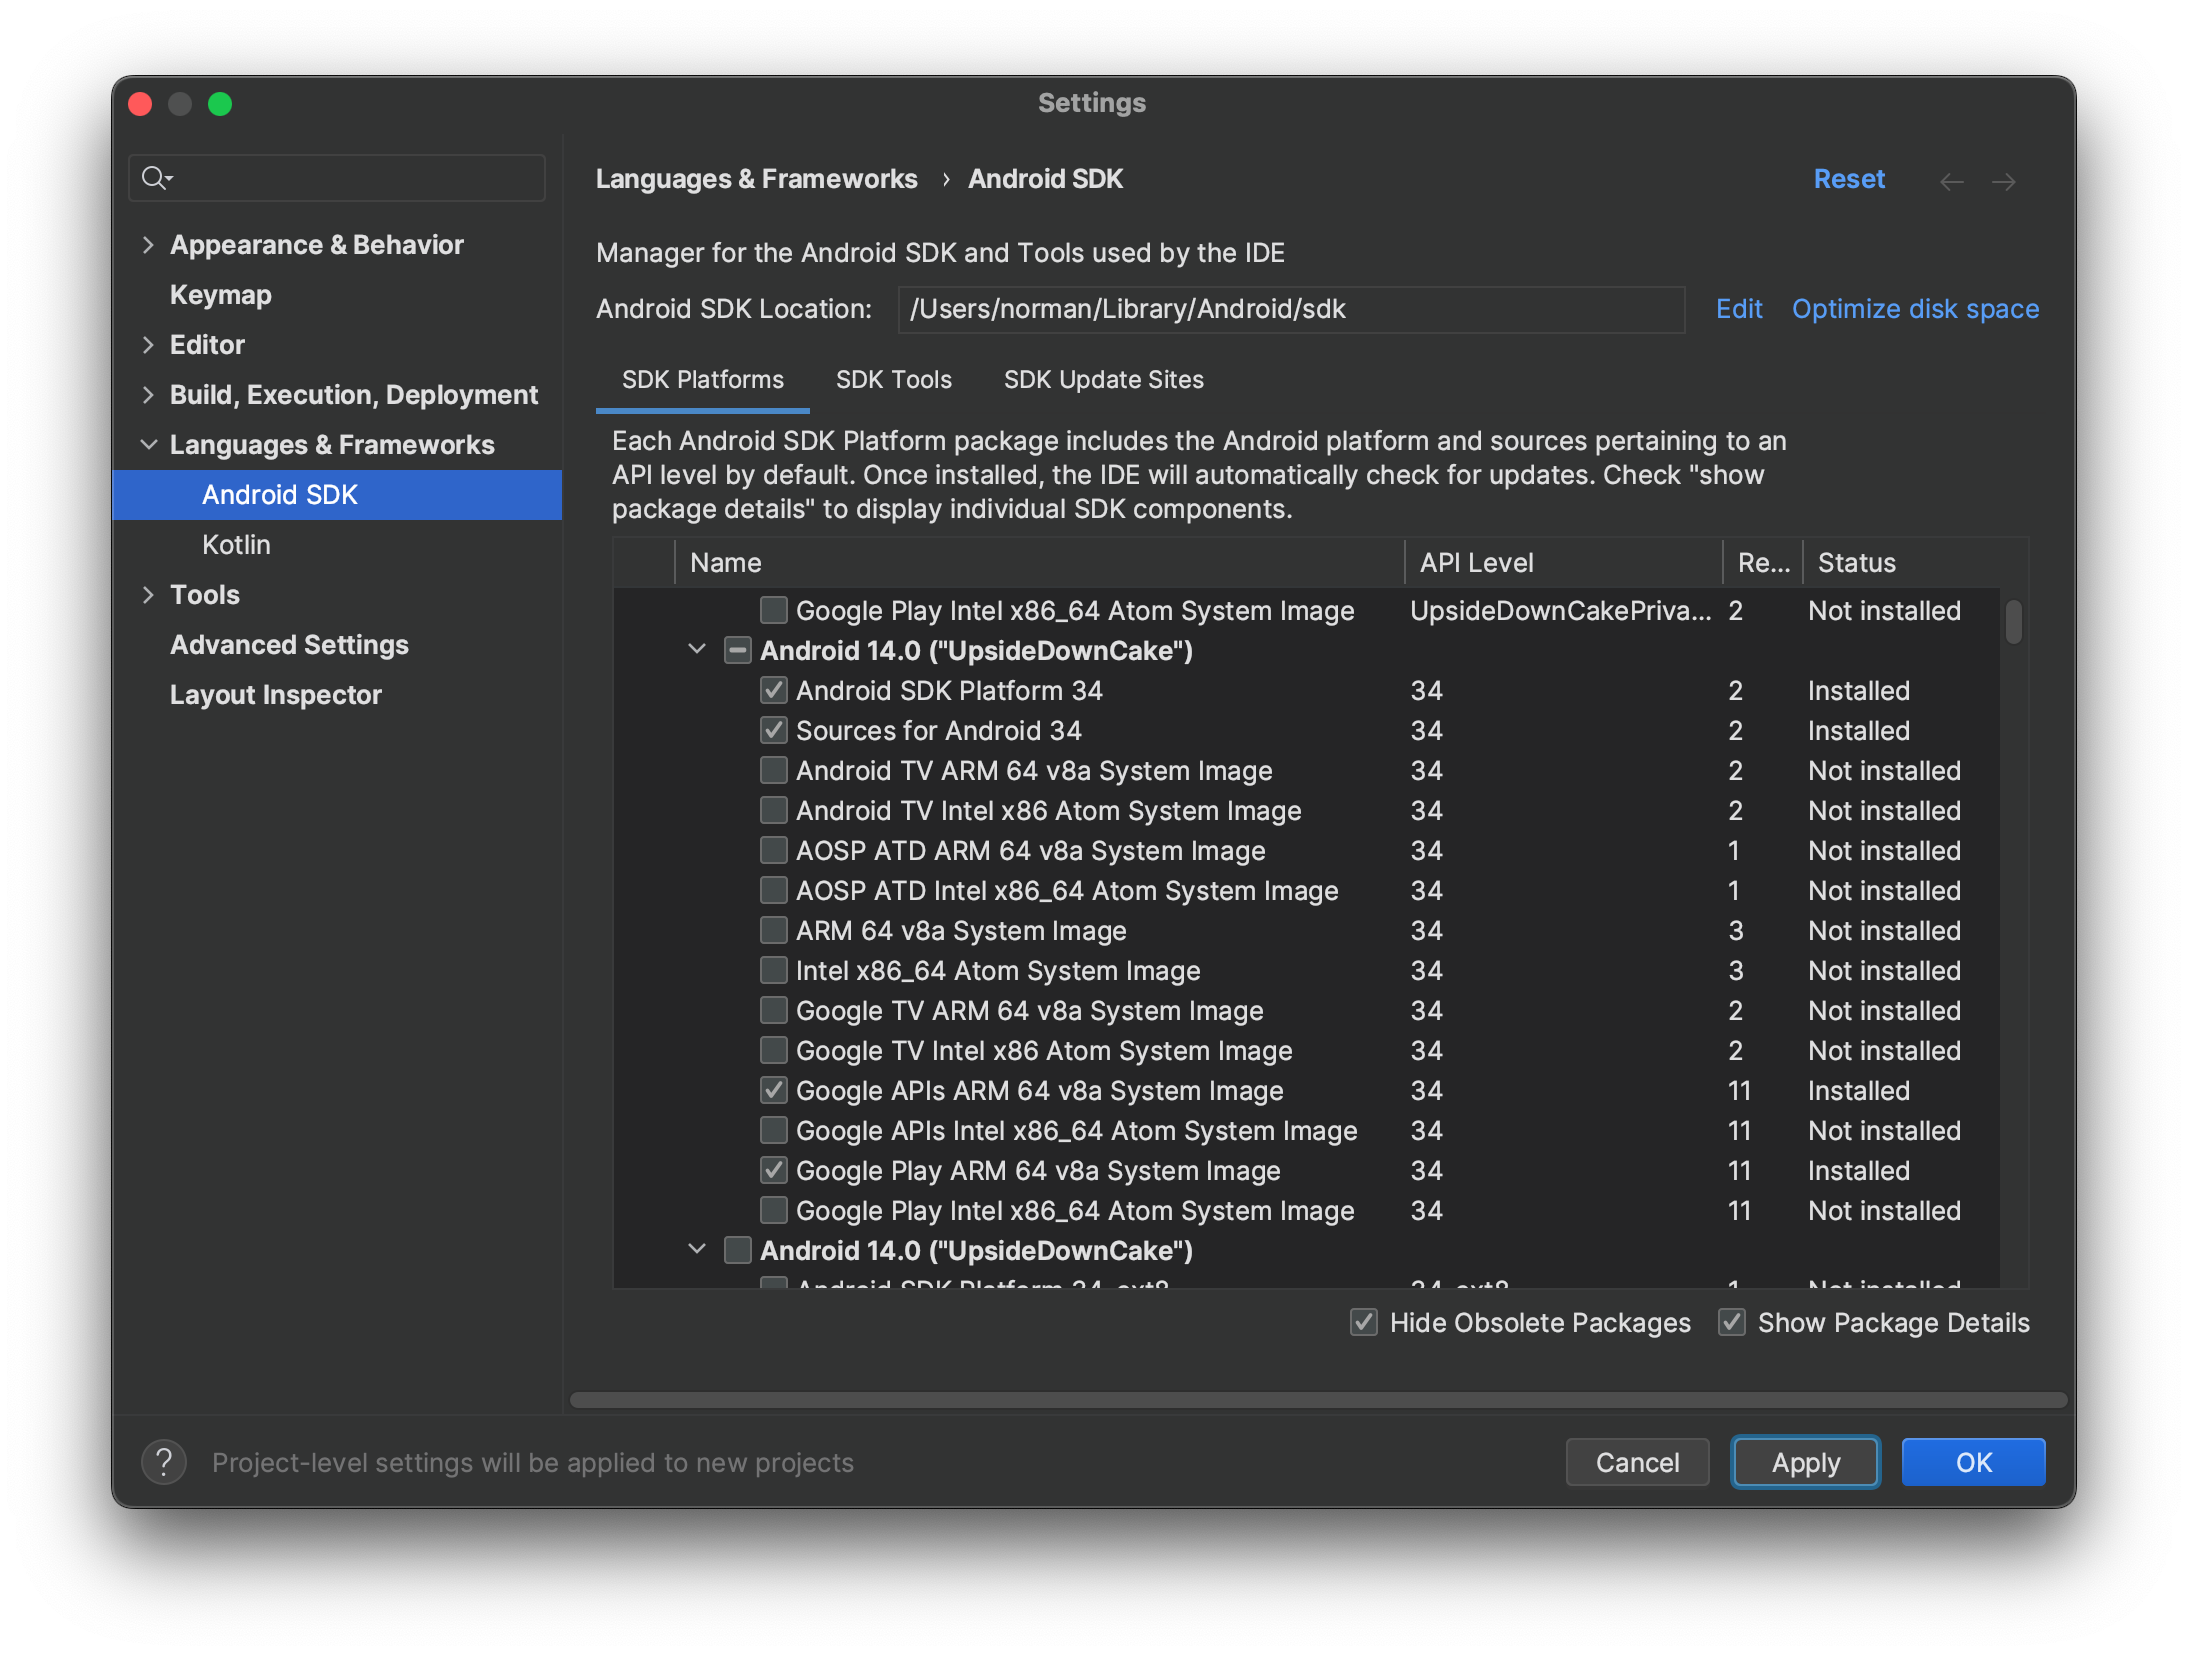
Installing the SDK Platform
Under the SDK Platforms tab there will be a list of platforms you can install, as well as system images for simulators.
The first SDK in the list is usually an early developer release/preview of the upcoming Android version. These are great to be ahead of the curve and to ensure your app continues to work on new android releases before the general public has access. The platform itself however may be buggy and generally isn't suitable for general app development.
The second in the list is generally the latest release, at the time of writing that's Android 14.0 "UpsideDownCake". This guide will assume Android 14, but if there is a newer SDK feel free to use it instead.
- Check
Android SDK Platform 34, this is the main package containing the Android SDK. Sources for Android 34is optional, but may assist in debugging packages.
Lastly a system image should be installed for the Android simulator. Which one that you should choose will depend on your host development machine. Users running on Intel/AMD x86 architecture should choose a x86_64 system image and users running on Mac with Apple silicon should choose ARM64 system image.
There are also several image types outside of architecture including:
- AOSP (ARM64 / Intel Atom)
- Google APIs
- Google Play
Which one you use will depend on your requirements. It is also possible to have more than one simulator created with different images for different test cases.
The Arm64 / Intel Atom image are generally barebones Android AOSP (Android Open Source Project). They will include original AOSP software which is often out-dated packages. It can be useful to test against old webview versions to ensure your app still works, even if the user has a severely out-dated device. Additionally these system images tends to offer better debug tools since the security policies are often relaxed.
Google APIs images ships with Google Play services allowing you to test against several google products including Firebase, Google Maps, Google Sign-in, etc. If your app integrates with any of these services, a Google APIs image might be necessary.
Google Play images are similar to Google APIs but they also have the Google Play Store available. They behave very closely to a real retail device and have a lot of security restrictions, so debuggability may be hindered on these images. But you'll have the ability to sign into a google account and update the simulator with the latest packages from the Google Play store, including the system webview.
Using a Google Play image when possible would be recommended for Fuse projects because it will allow you to keep your simulator up to date with the latest system webview, which your app will live in. Ensuring that it always works against the latest webview will be desirable.
Once all of the packages is selected, click Apply to download and install. This may take awhile.
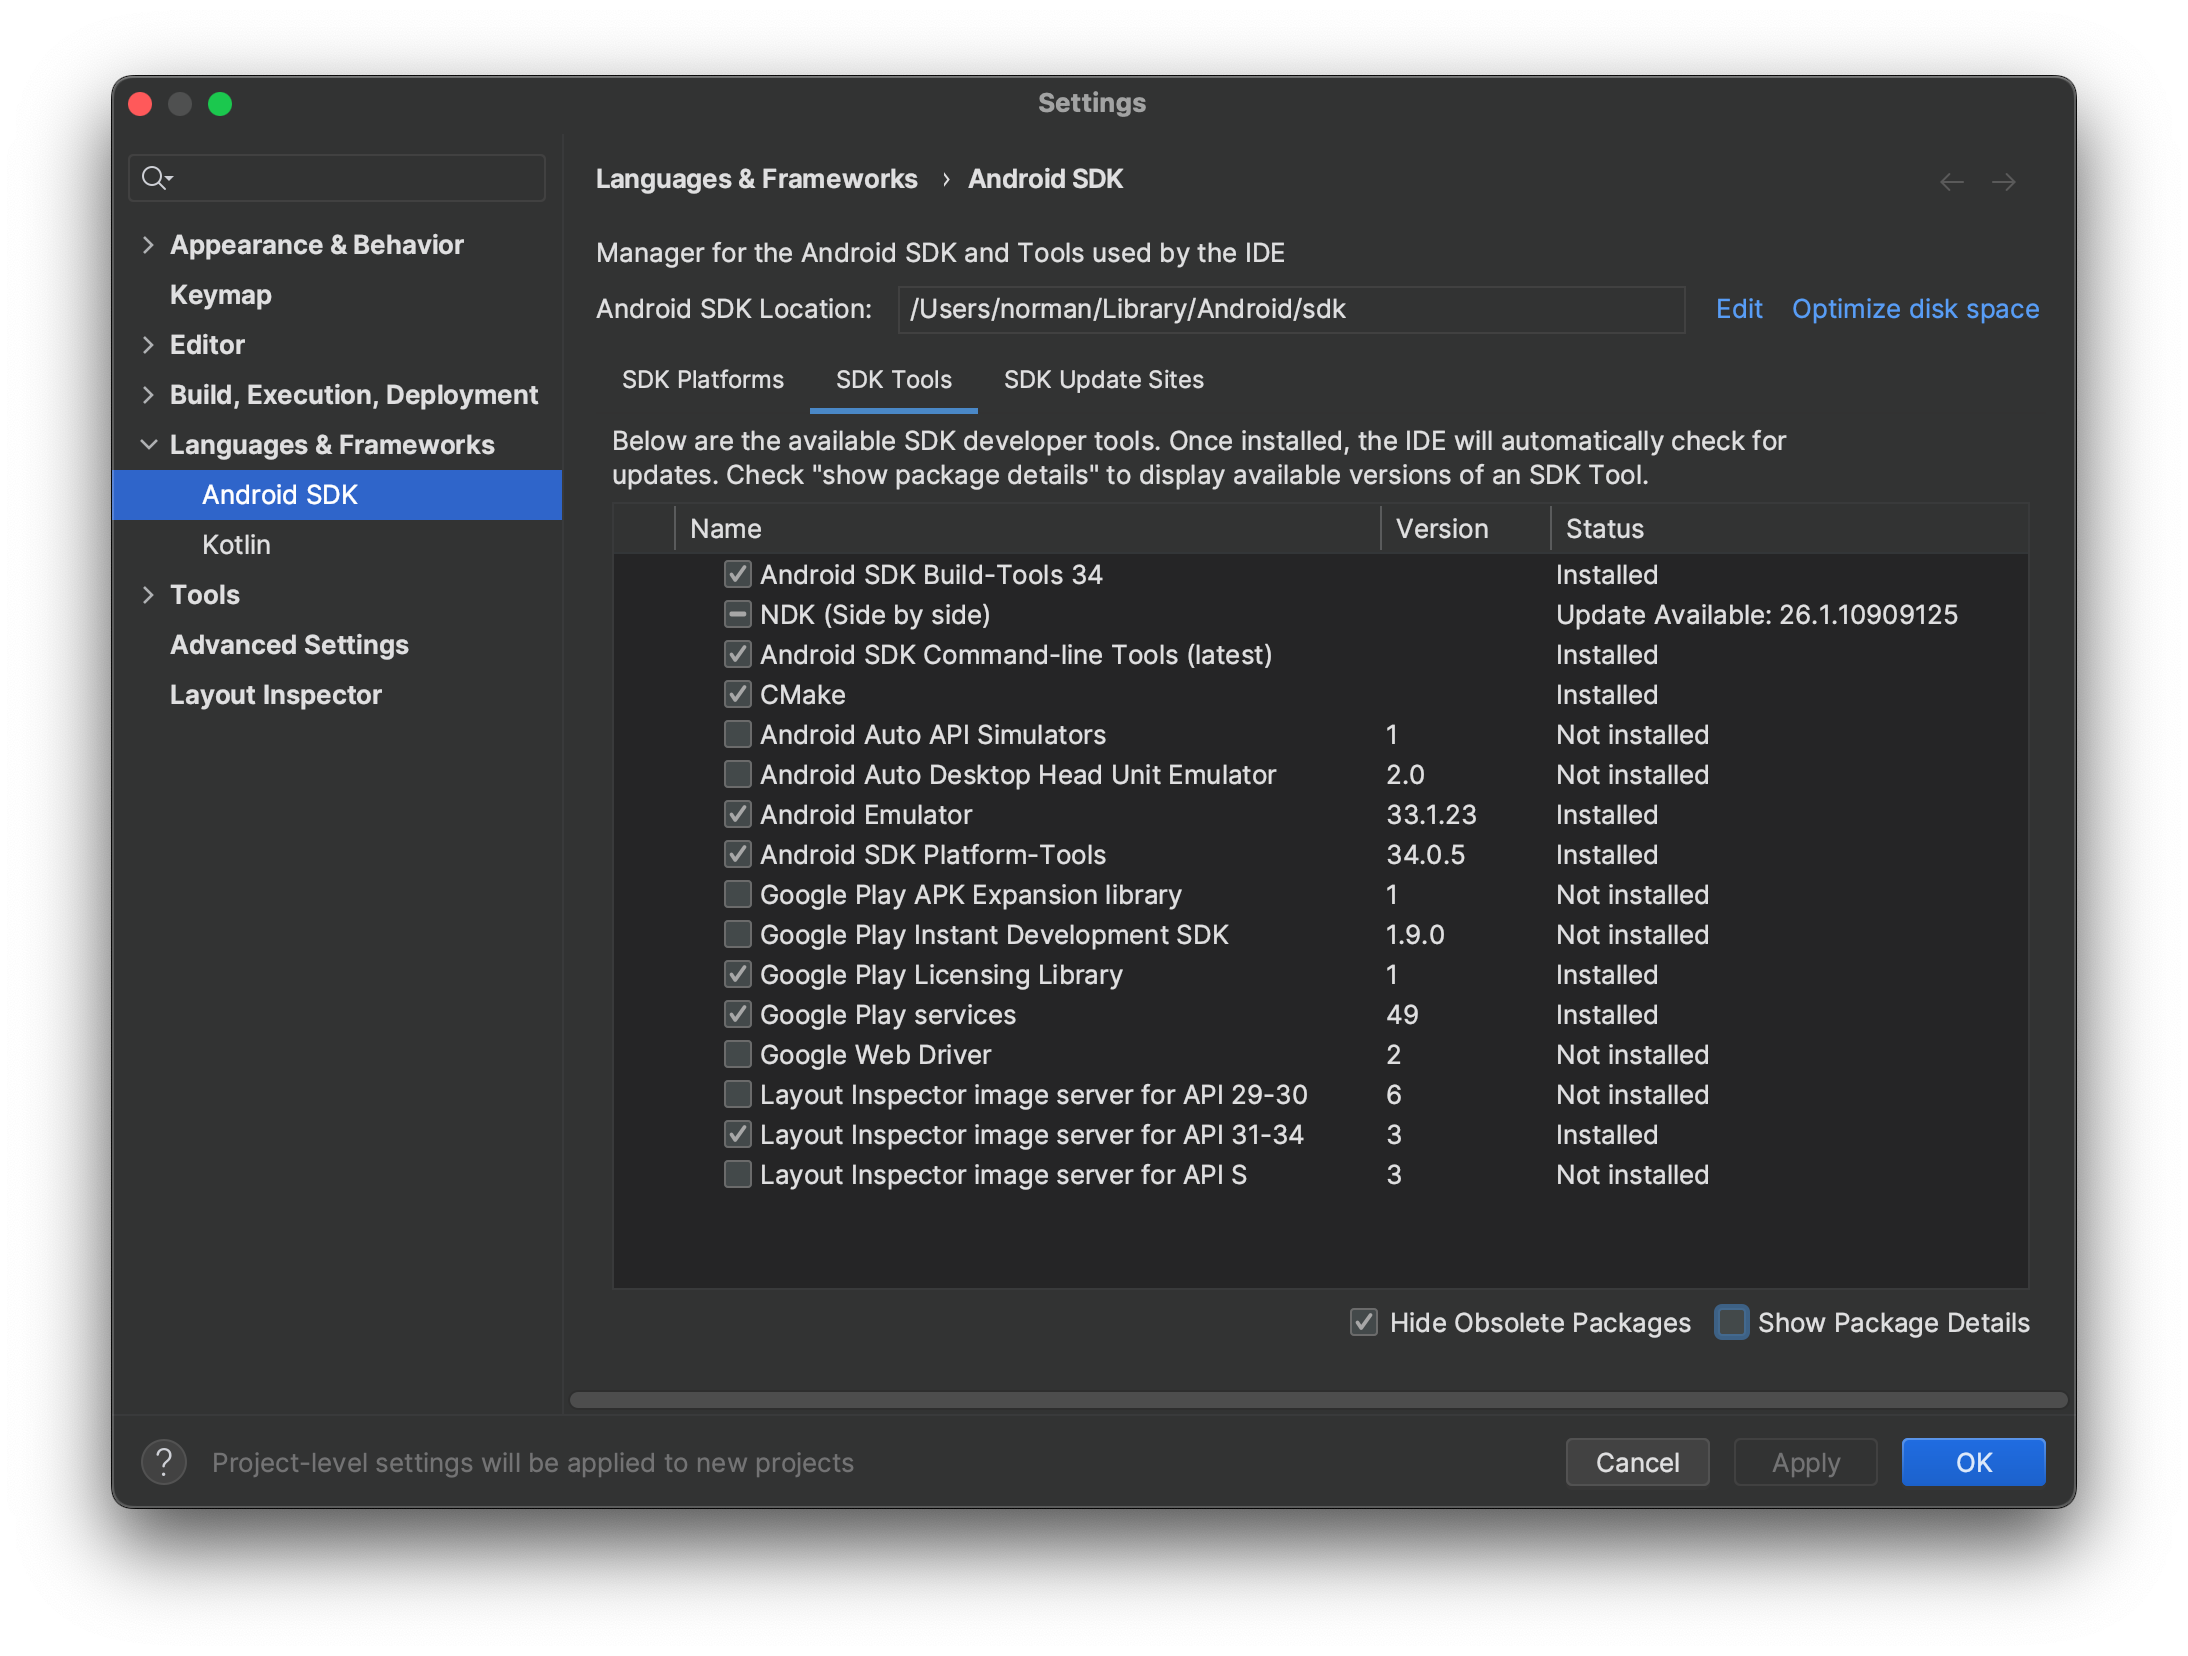
SDK Tools
Under the SDK Tools tab there is several additional tools. Install the following:
- Android SDK Build-Tools
- Android SDK Command-line Tools
- Android Emulator
- Android SDK Platform-Tools
- Google Play Services (Optional, but required if you use any Google APIs)
- Layout inspector image server for API 31-34 (Optional)
If you plan on using C++ and native development then you'll also need:
- CMake
- NDK (Side by side)
Tip
Show Package Details will make the SDK Tools list expandable so that specific versions of each package can be installed if necessary.
Once all the SDK tools is selected, click on Apply to download and install. This may take awhile.
Once done, you may close the SDK Manager.
Creating an Android Emulator
Now that we have our packages installed, now it's a good time to create an Android emulator.
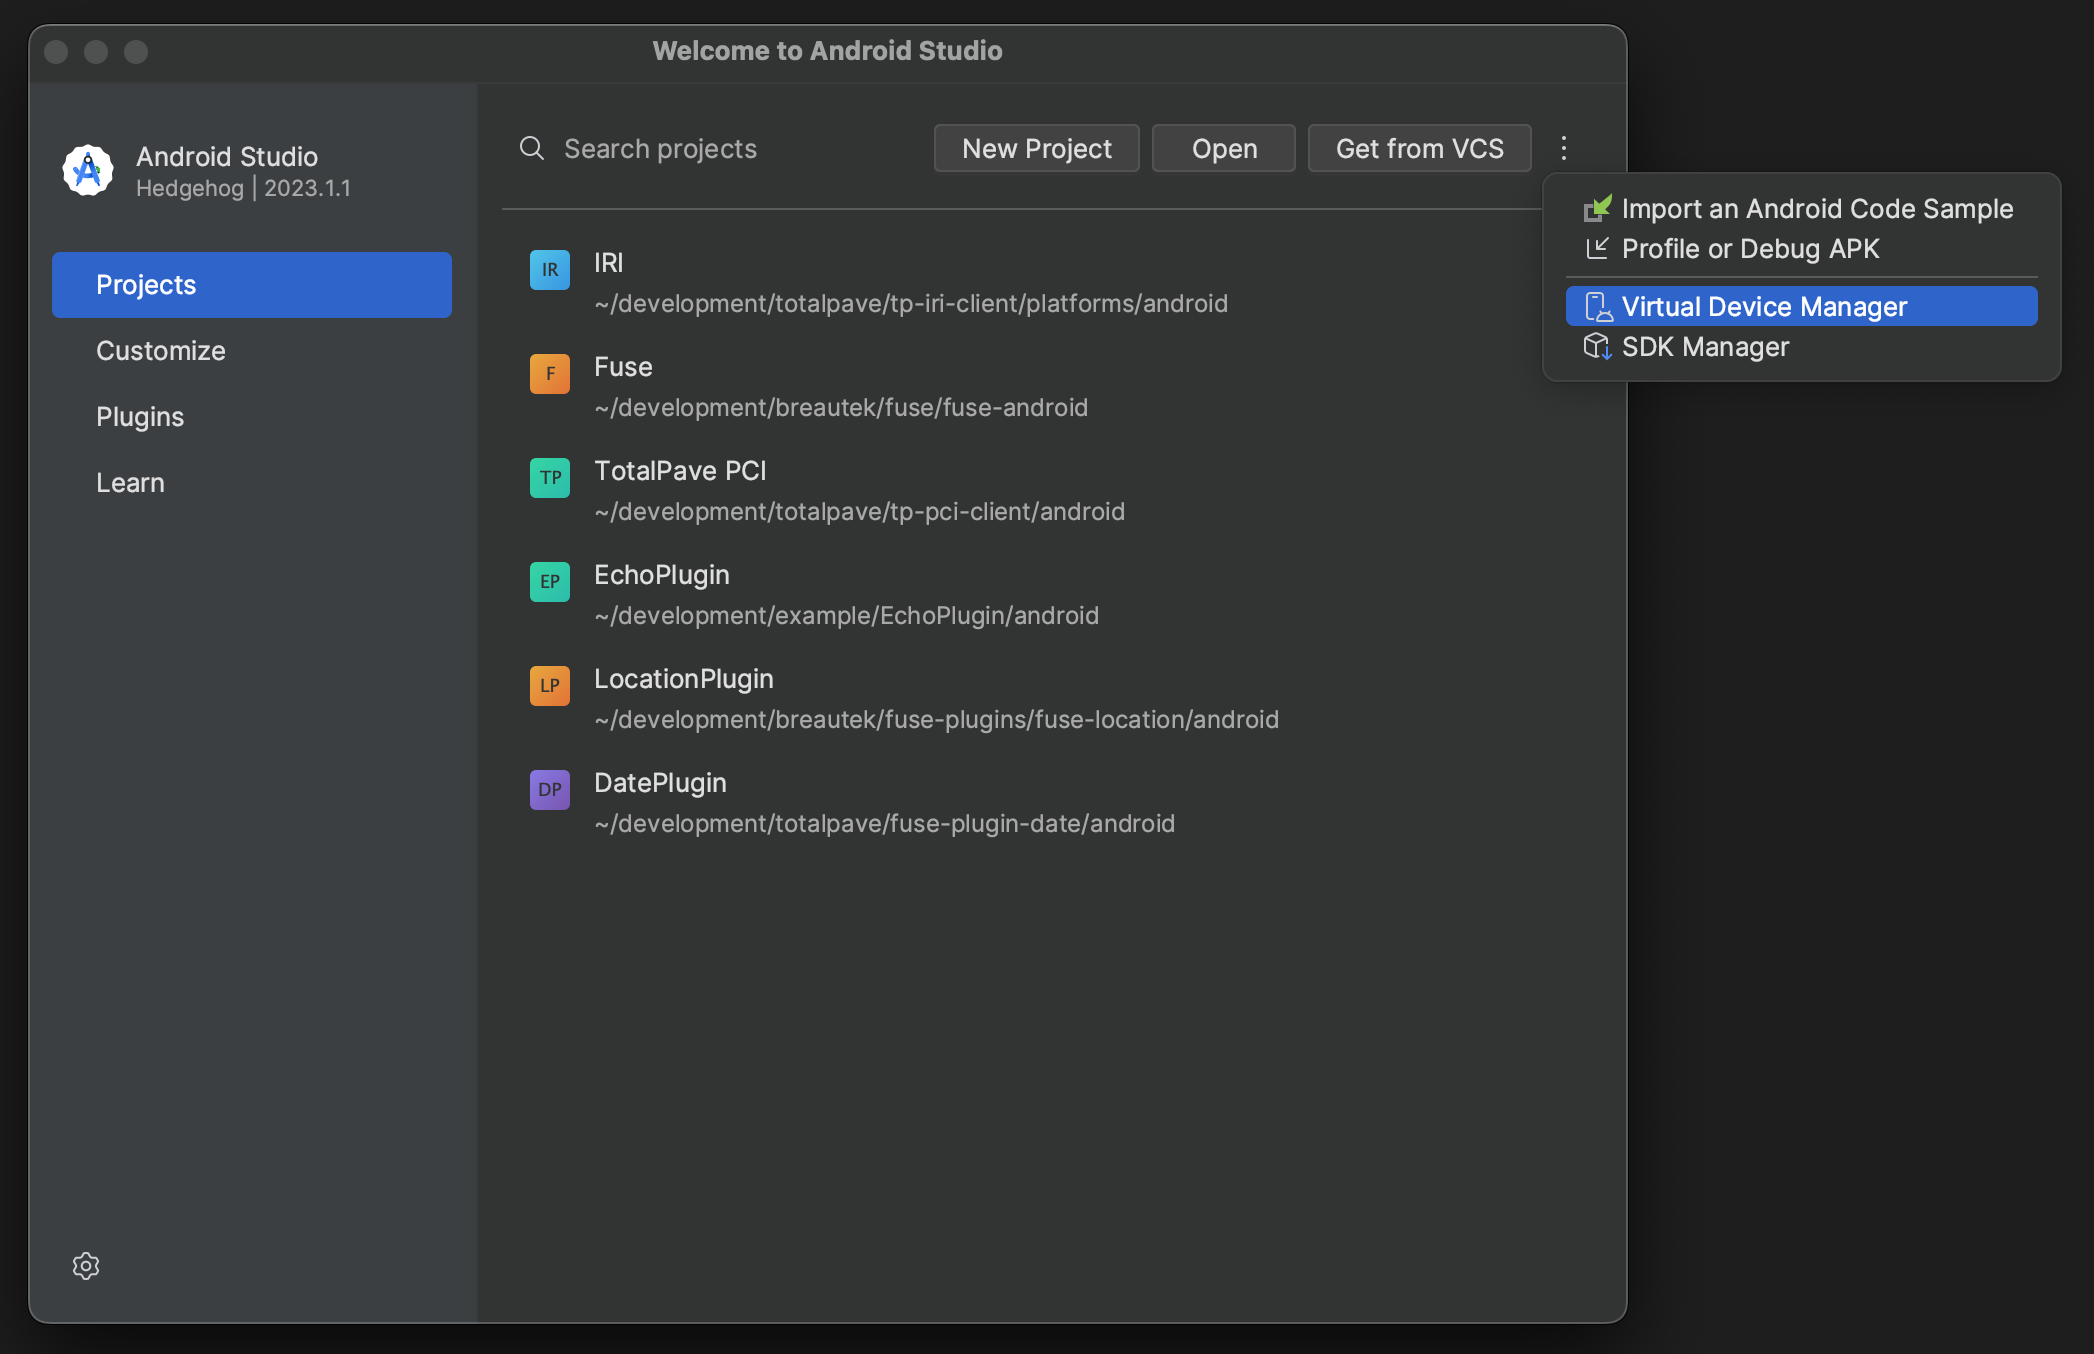
From the Welcome to Android Studio window, click on the triple dot and go to Virtual Device Manager.
This will open a Device Manager window that will list any virtual and physical devices. You can start or edit any virtual device or create new ones. Click on the + button to create a new virtual device, which will open a wizard.
First, it will ask you to create a device definition. You can select from variety of different phones based on their size, density, and other hardware profiles. I'd recommend choosing a profile that has Play Store support as indicated by the Google Play icon.
For this guide, I'll be choosing the Pixel 7

Tip
Keep your Android Studio updated to have the latest profiles avilable.
Click Next to continue. The next step is to select a system image.
The UI will provide 3 tabs: Recommended, ARM/x86_64 Images, and Other Images.
ARM/x86_64 Images depends on your host CPU architecture. Apple Silicon users for example will see ARM Images, which will show a filtered list of ARM images of all supported API levels. Other Images will show all available images regardless of architecture.
If you're missing any particular image, you can also download it in this screen.
For the purpose of this guide, we will be using the current Android Release (Android 14), so I'll be choosing API 34 with Google Play.
Note
This guide is being authored on an ARM64 host machine. If you're using AMD/Intel, then you'll likely see x86_64 architectures instead.
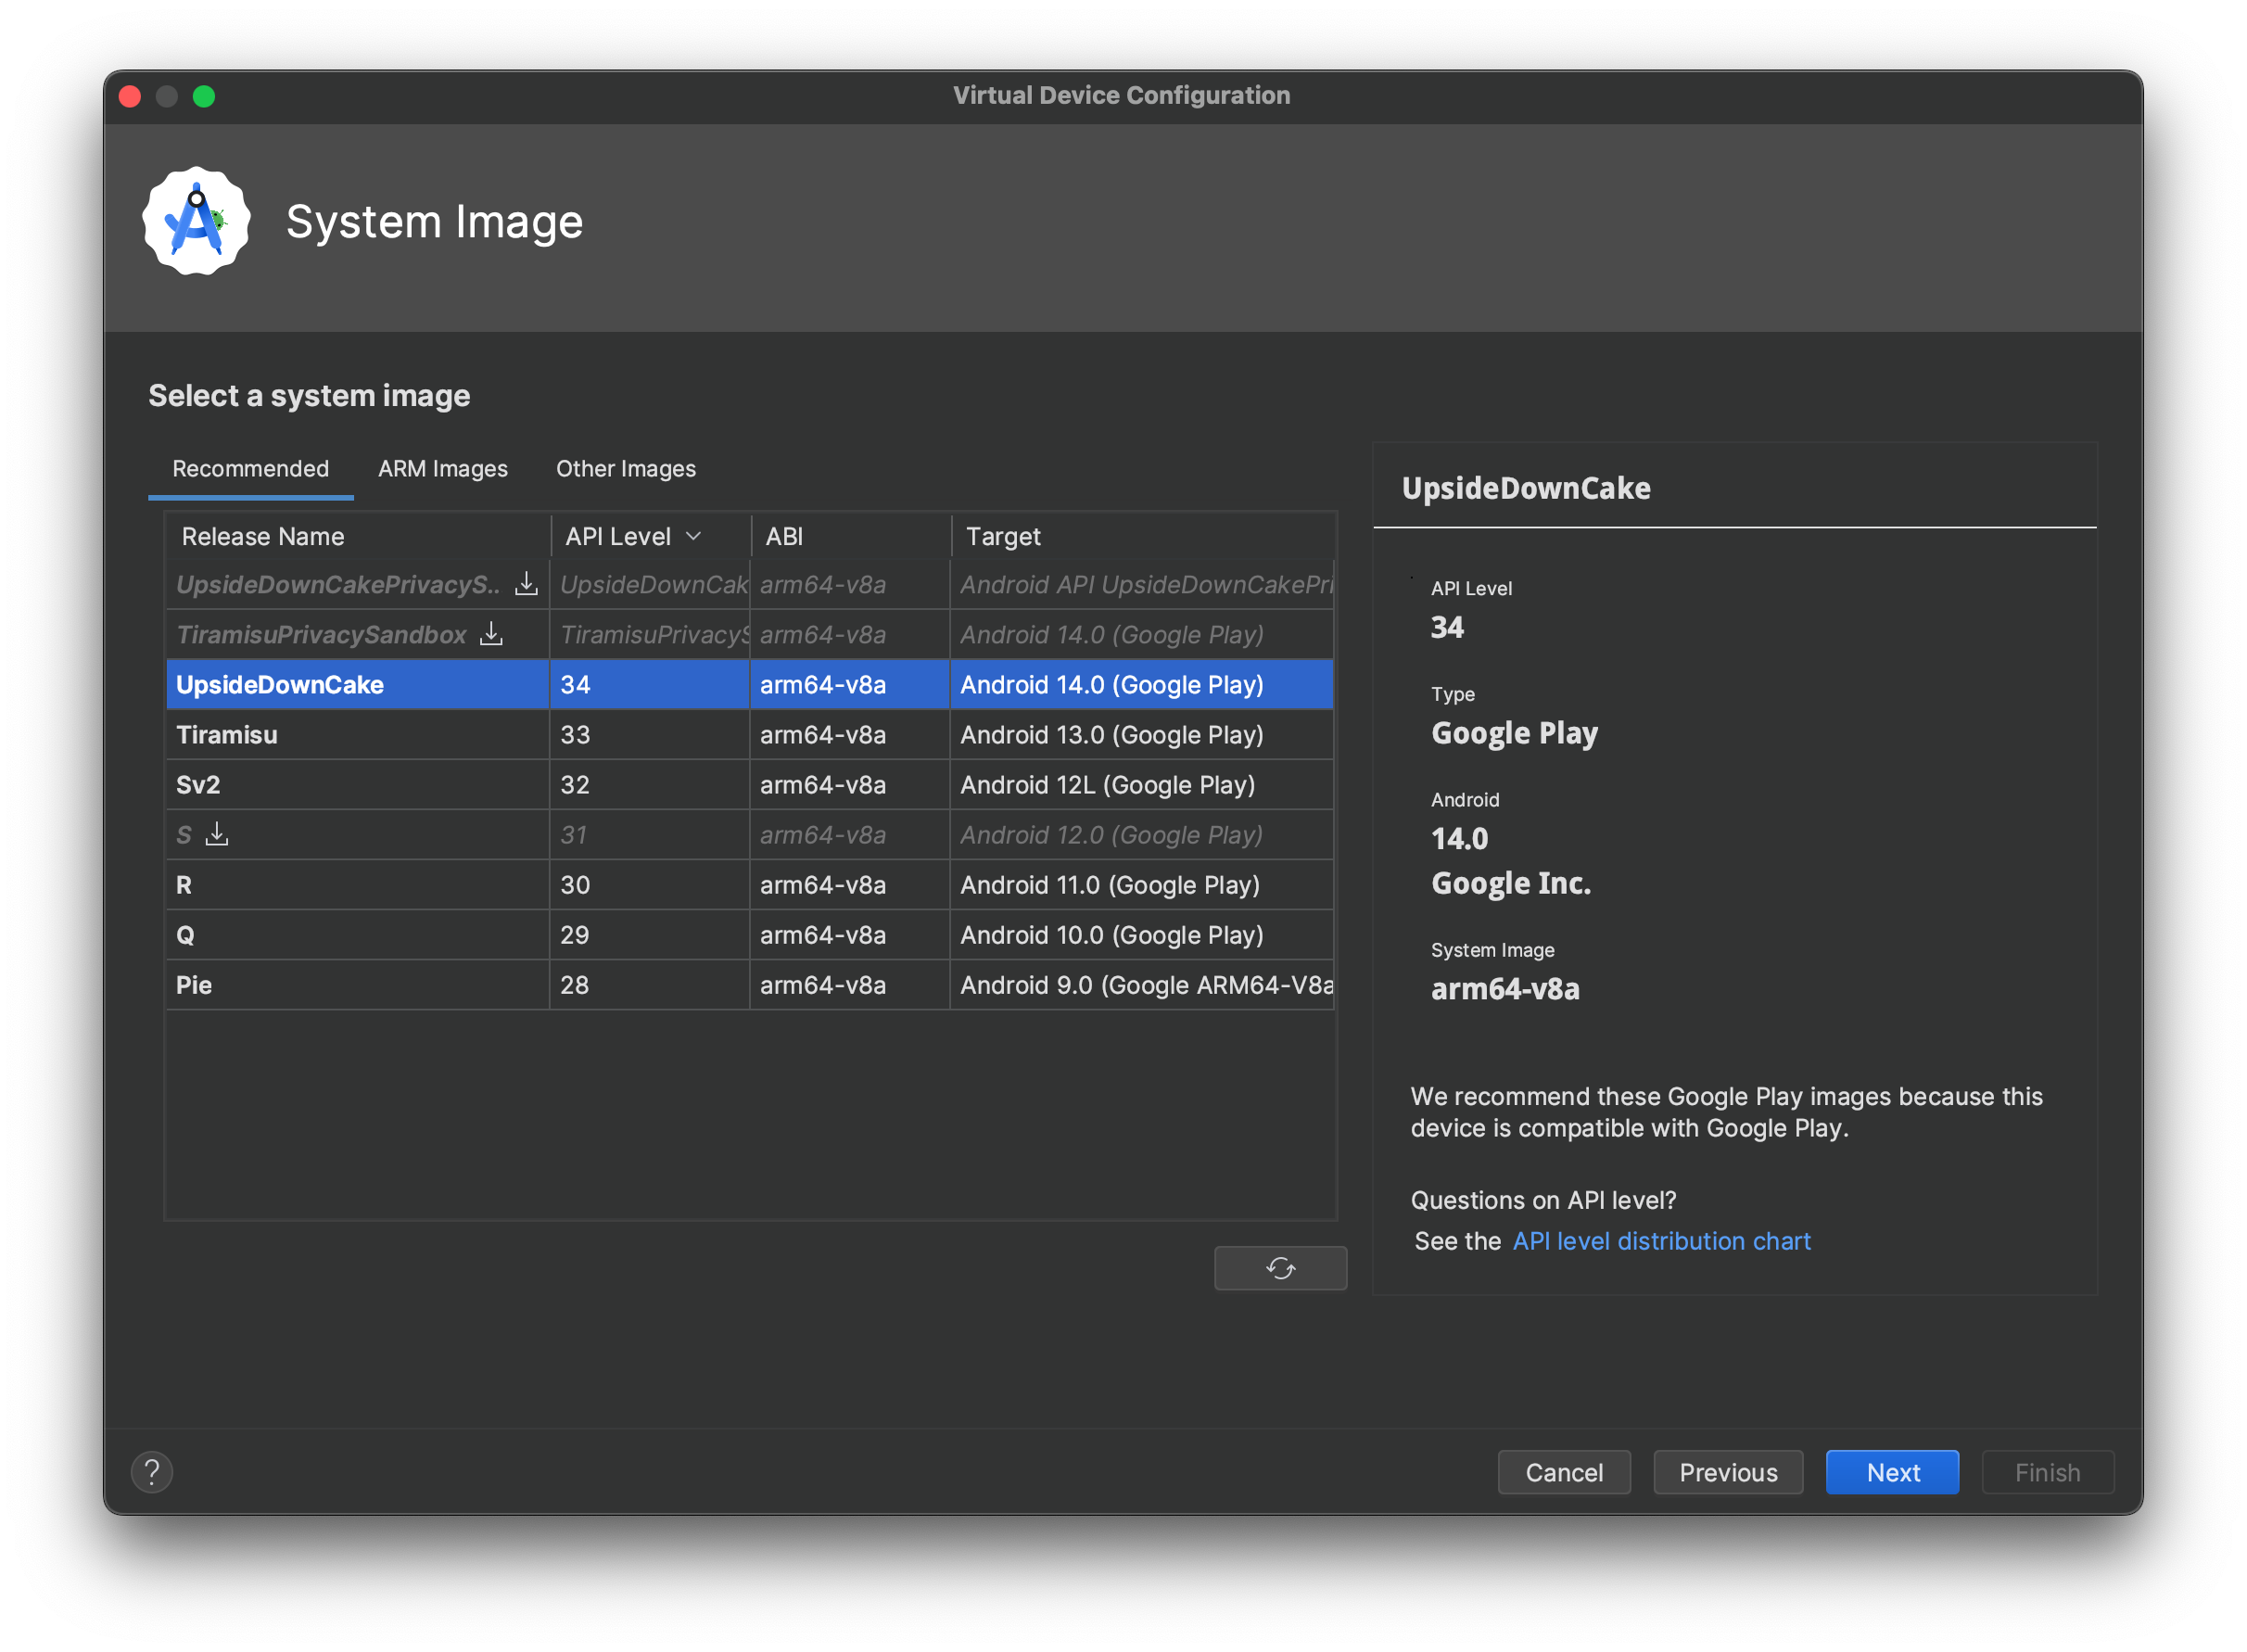
Click Next to continue, to verify your device configuration.
Here we can set a name of your device, and adjust some other advanced settings. Most of the time you can simply click Finish but feel free to explore your options.
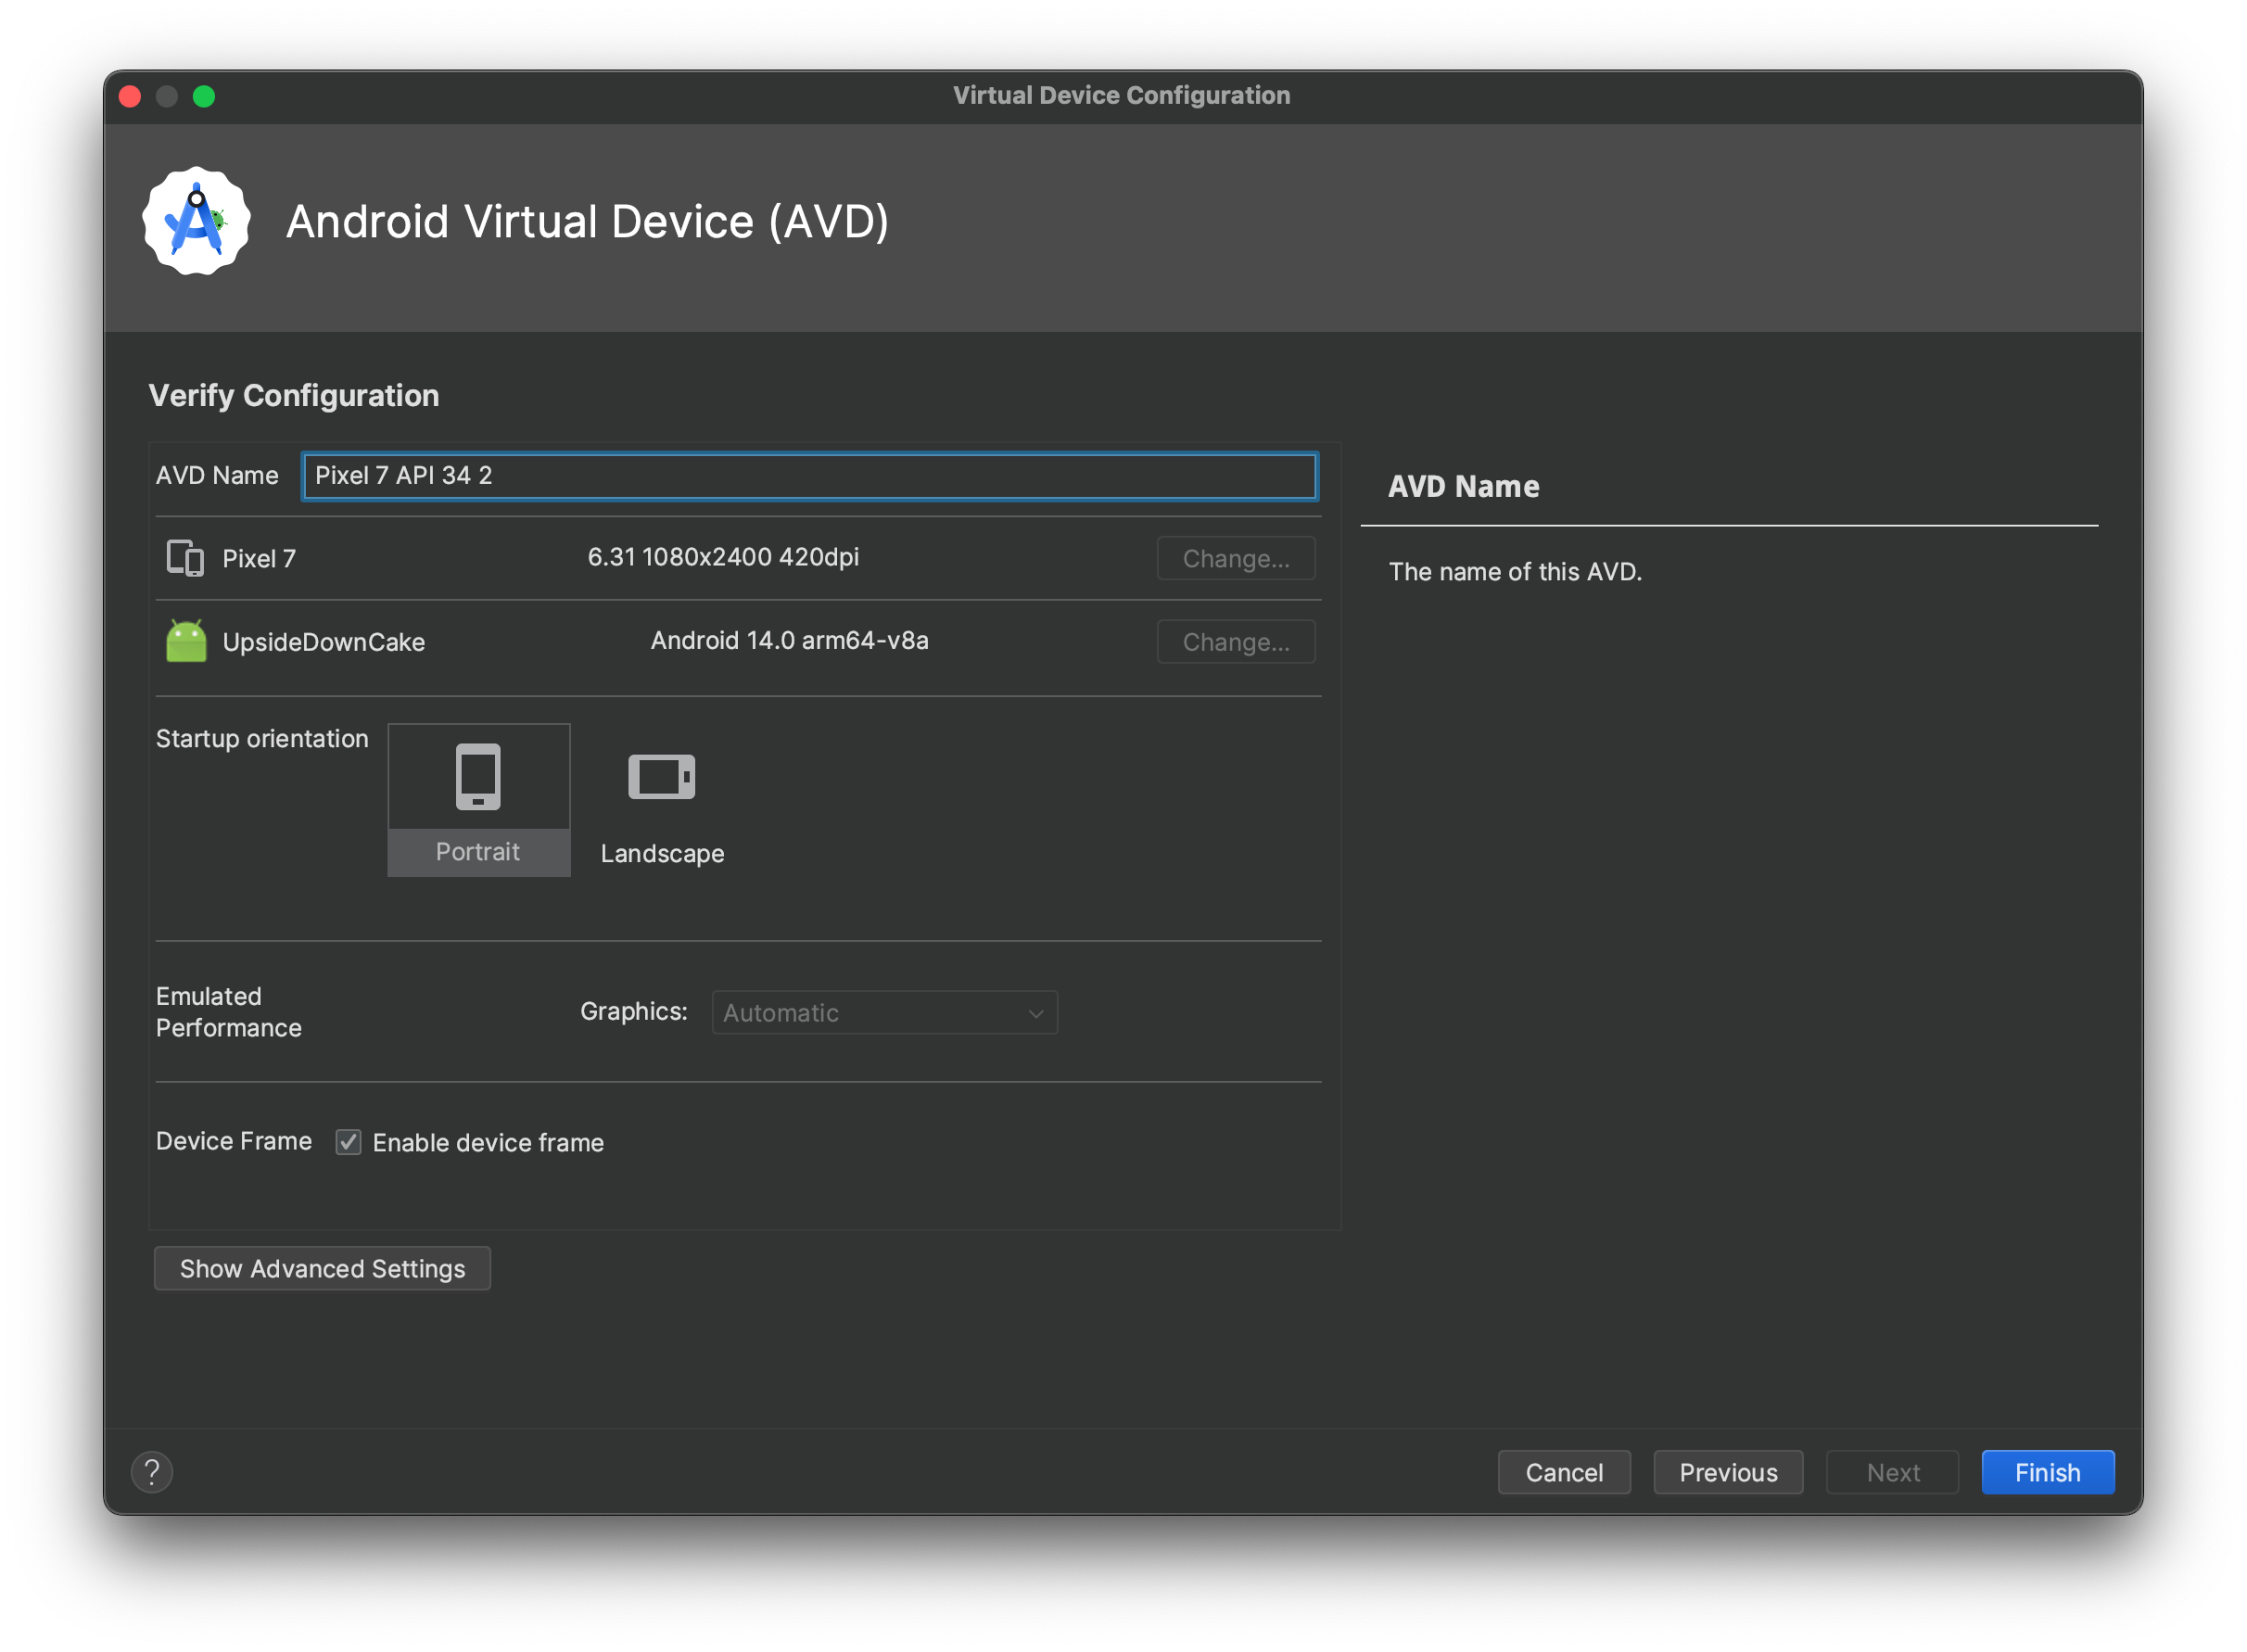
Now your virtual devilce will appear in the Device Manager. Click on the play icon to start it!
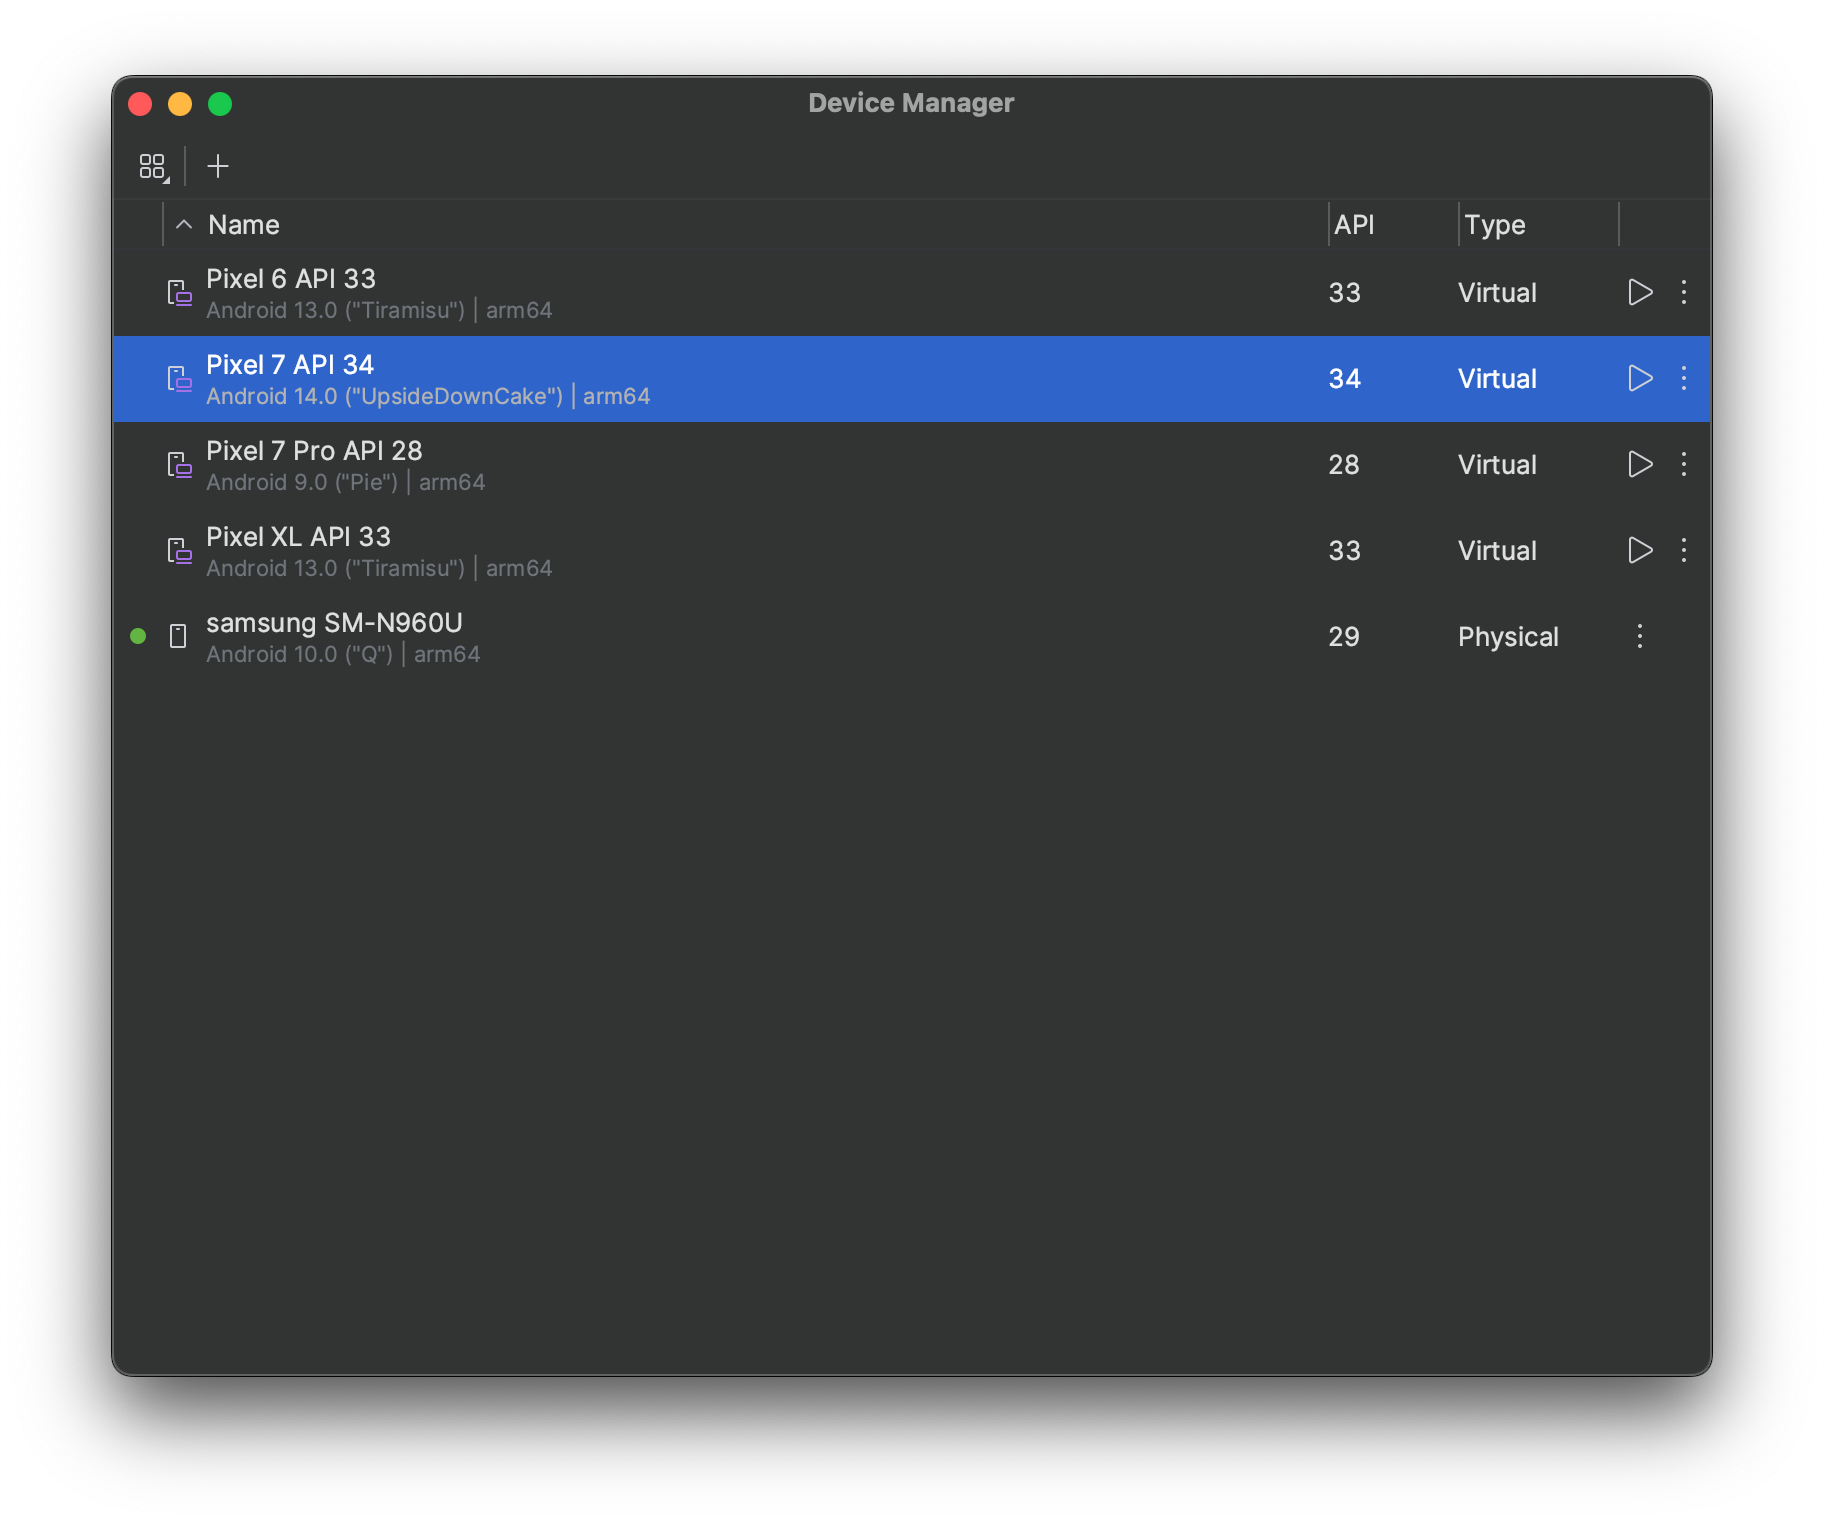
This simulator is a Google Play simulator. Feel free to sign into your google account on the simulator and start updating the device to the latest version of all the packages, especially the Android System Webview.
Android simulators are full-featured virtual machines and are very powerful but can also be expensive on your system resources. We won't be using the simulator for awhile, so if you're using a more constrained system, you may stop the simulator as well, or stop it after it has finished updating from Google Play store.
Creating an Android Project
Now that we got all of our pre-requisites covered, it's time to start on more exciting stuff!
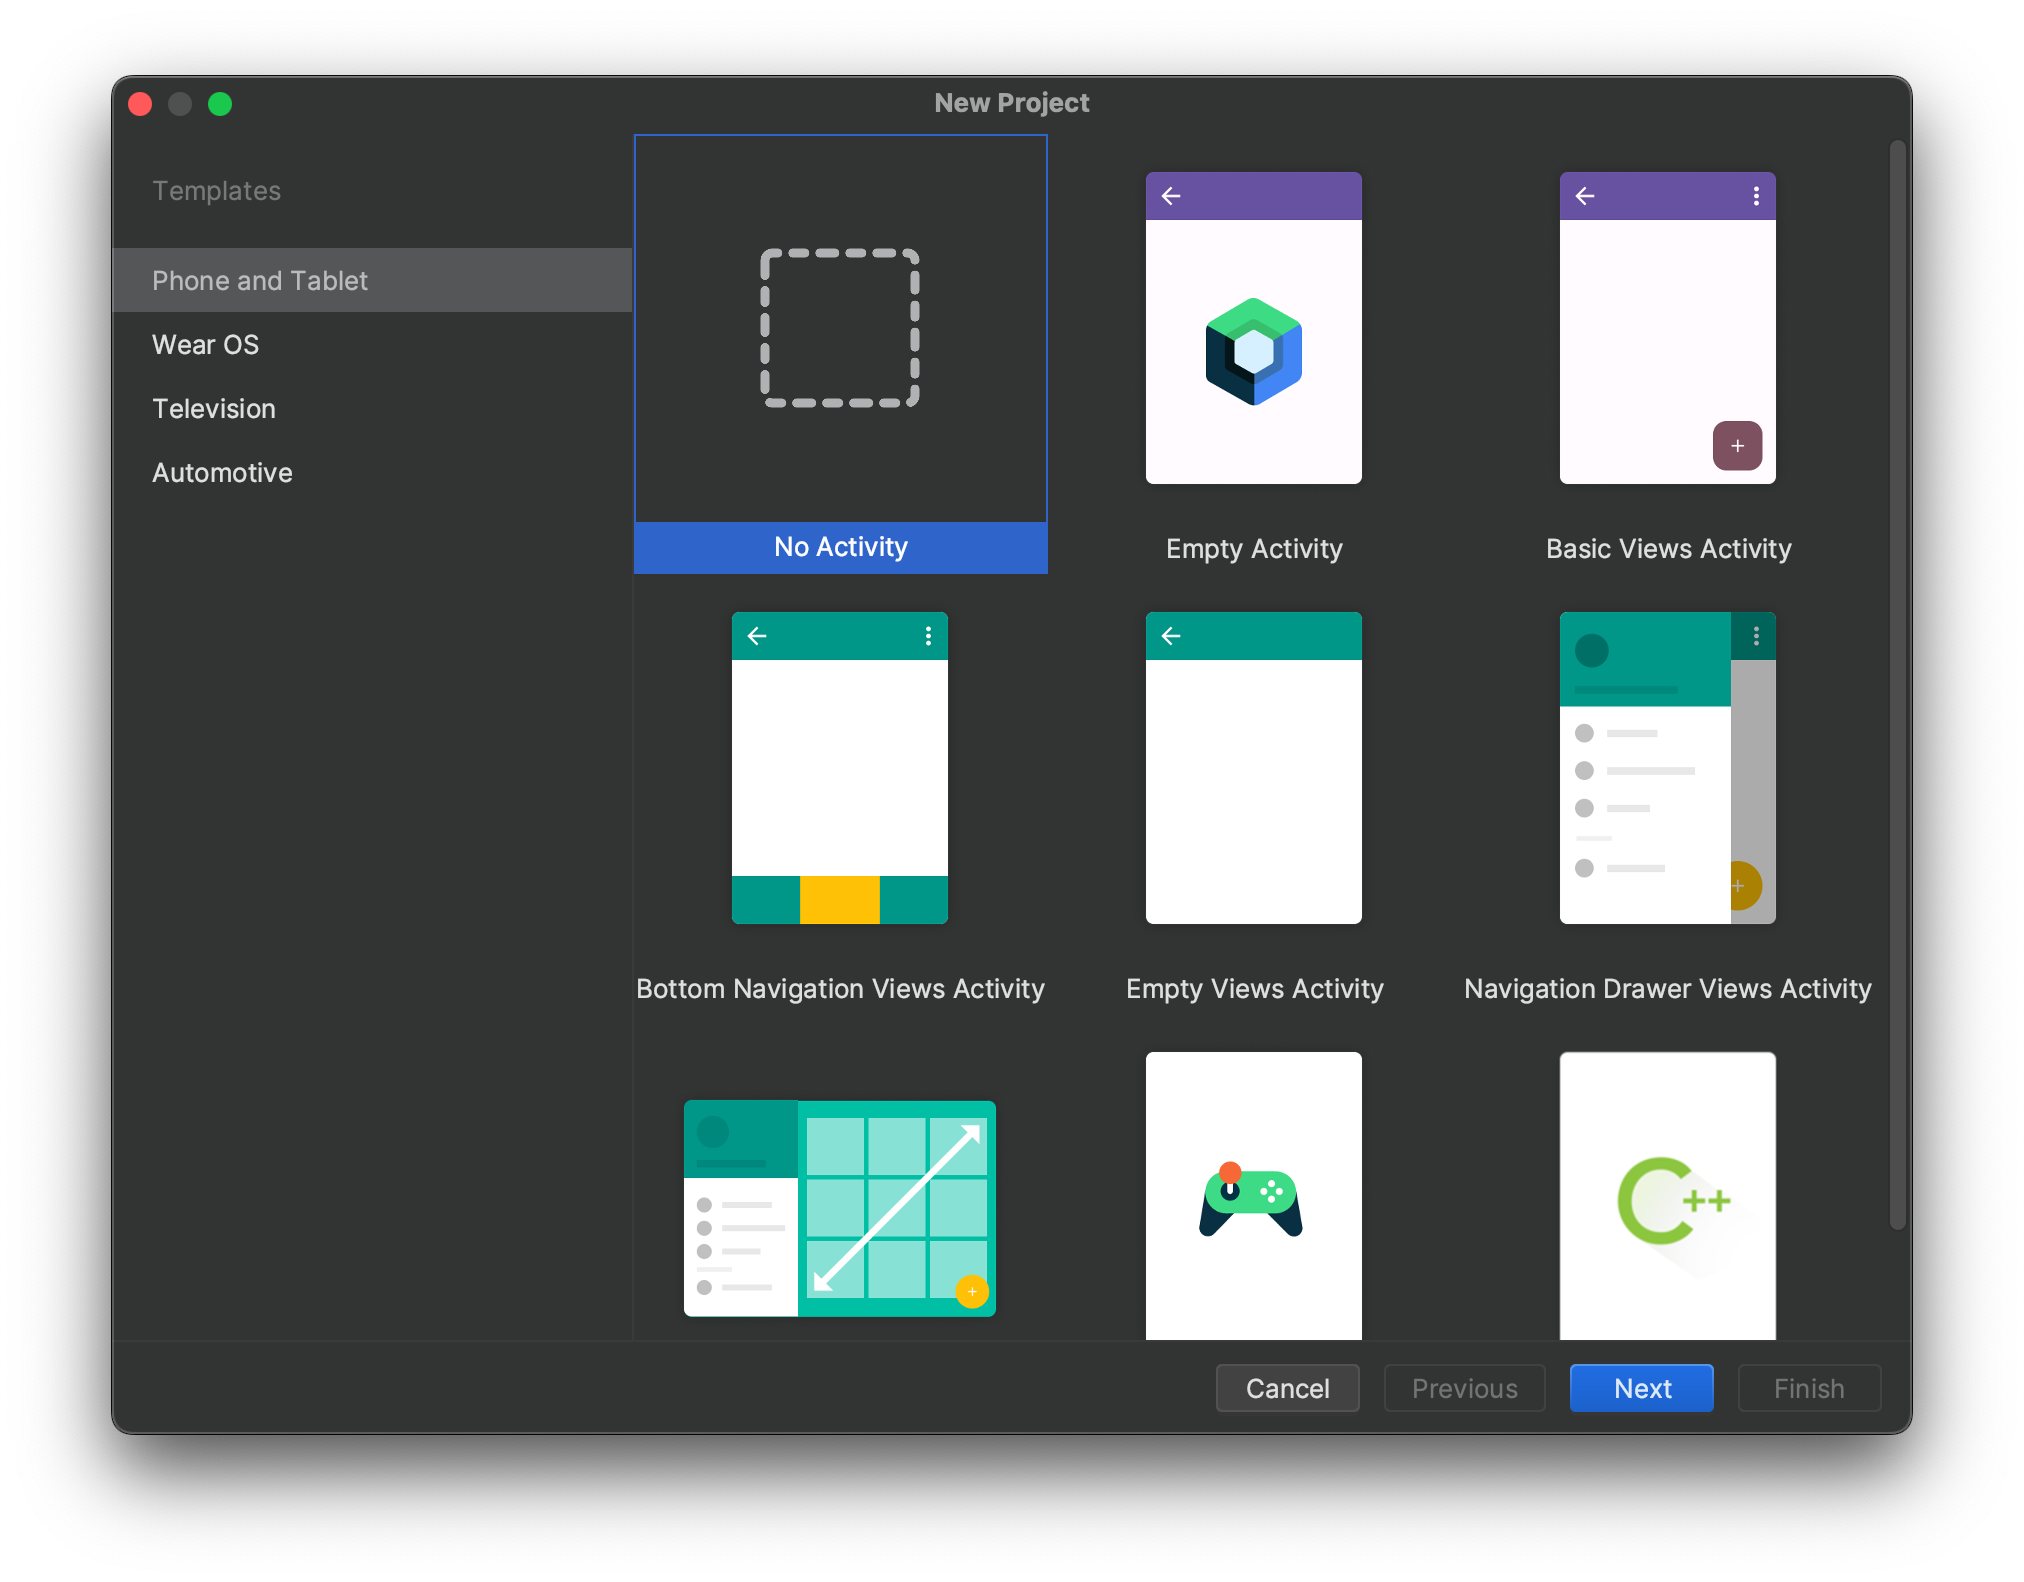
From the Welcome to Android Studio screen, click on New Project and select No Activity.
Note
We are selecting No Activity because the other templates includes things that doesn't make a whole lot of sense for a hybrid application. However if you have unique requirements, other activity templates should work too.
Click Next will take you to a form detailing some details of your project.
The important bit is Save location, which I'd suggest saving it inside a /android directory of your project repo.
All other settings are preference but this guide will use Java programming language and the Kotlin DSL.
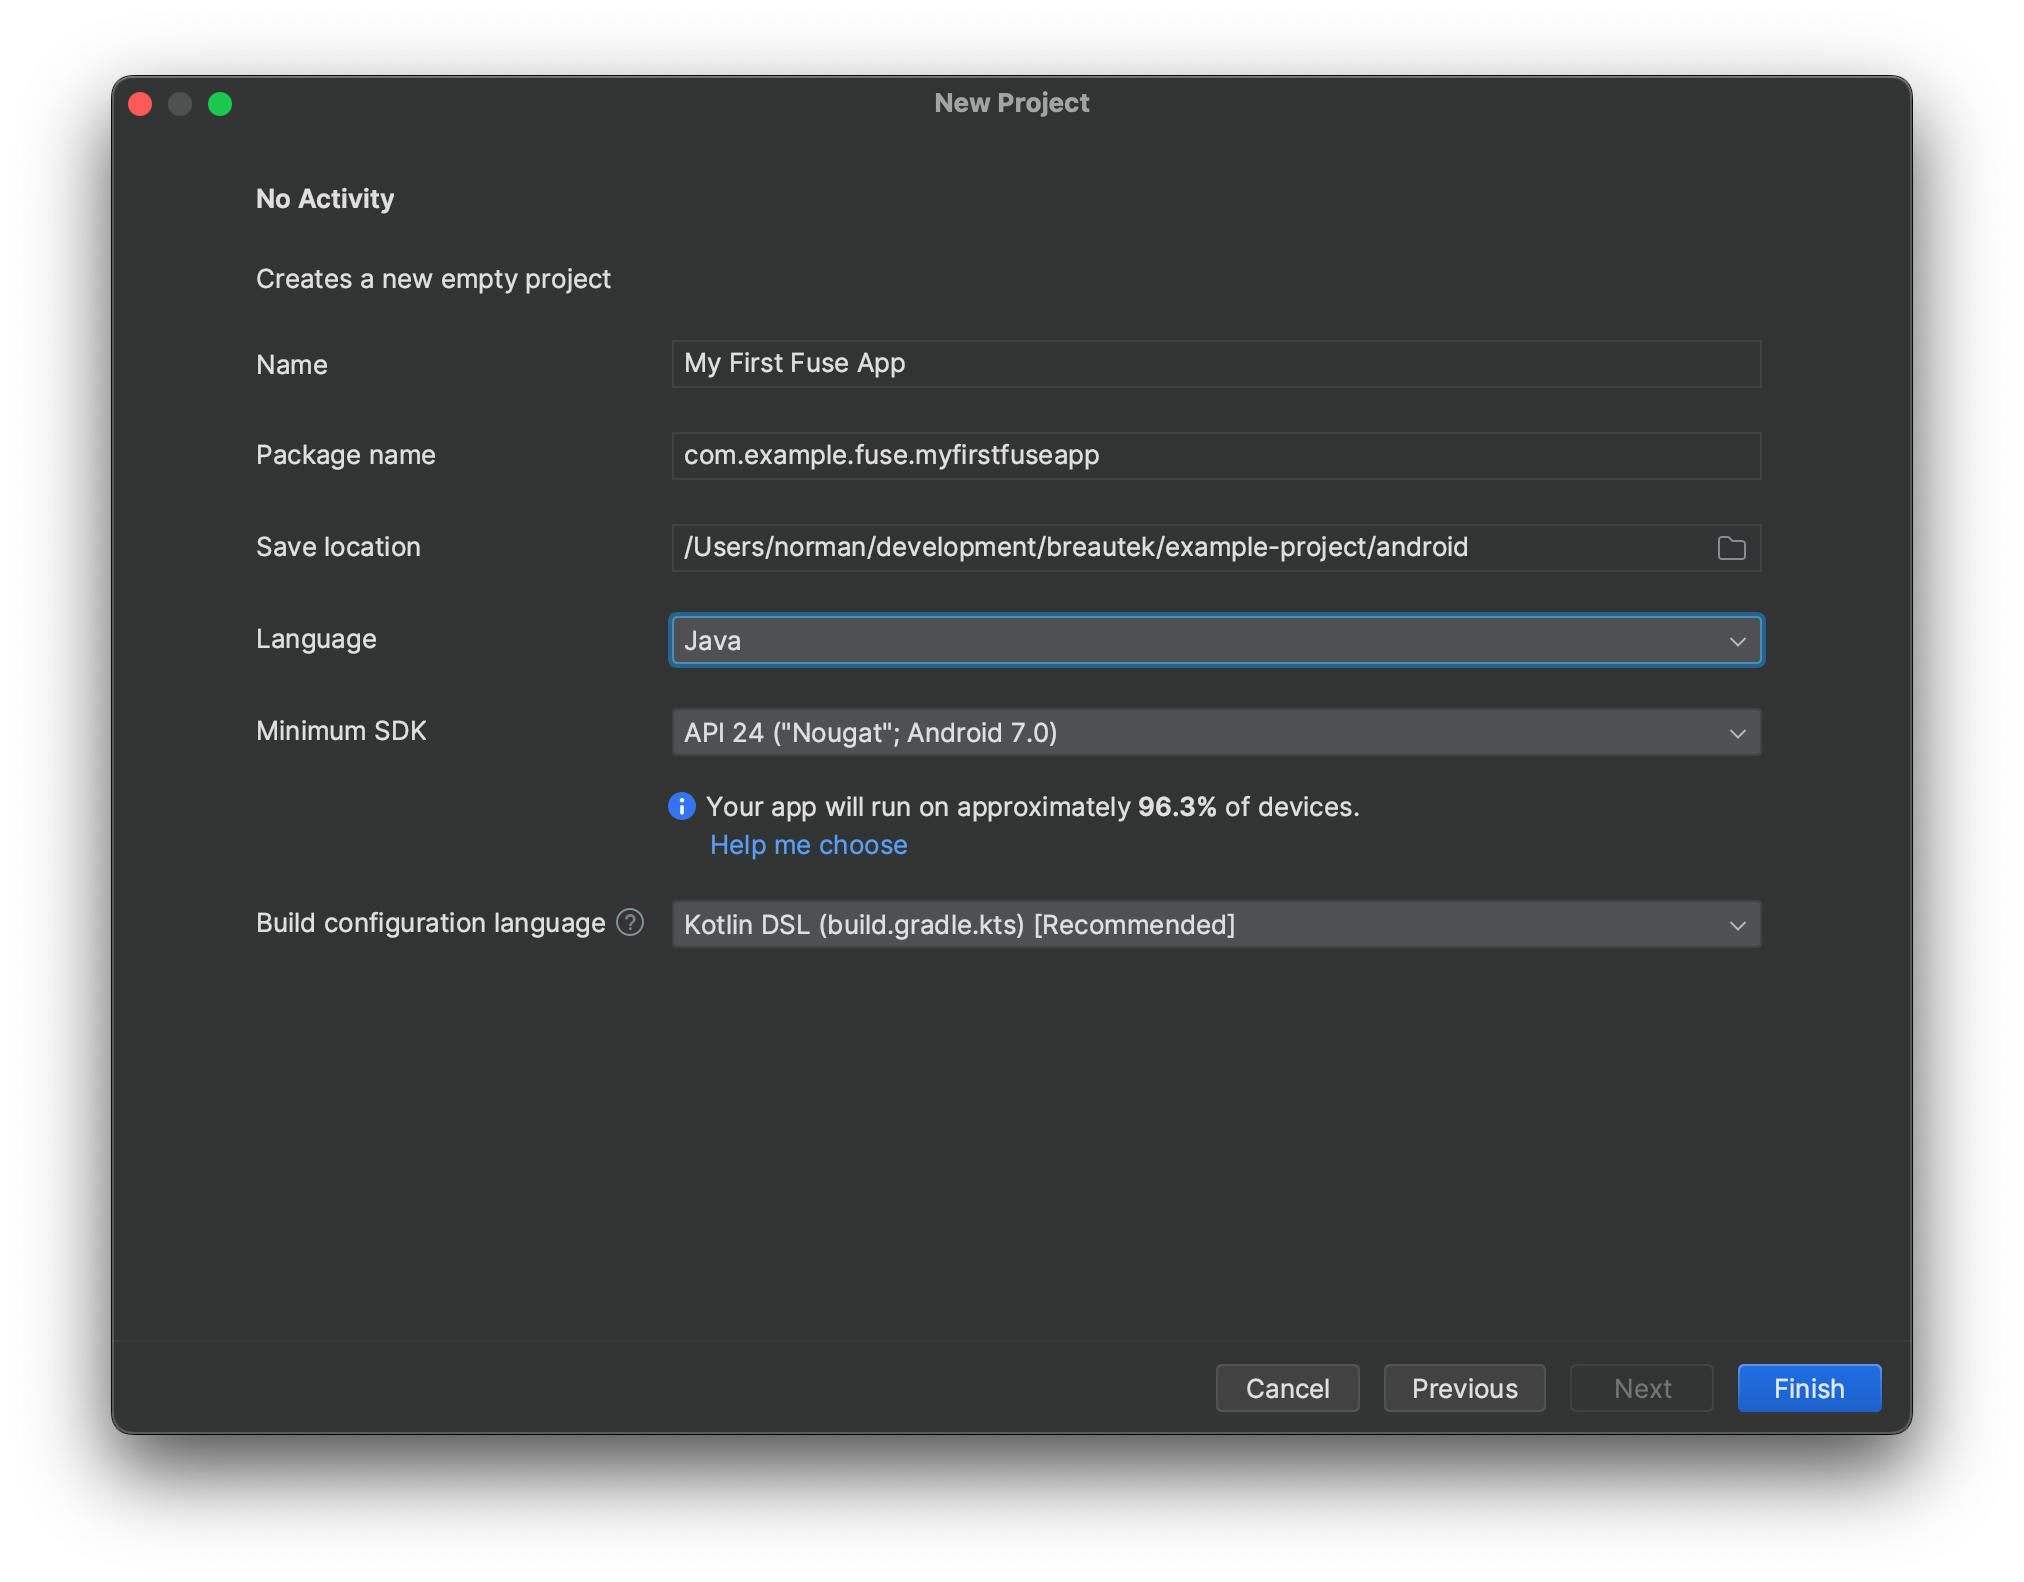
Click Finish and Android Studio will setup your application and initiate a Gradle sync. Once Gradle is finished syncing, you'll be able to interact the IDE.
Creating the MainActivity
Since we used a No Activity template, the App has no starting activity. Let's fix that right now.
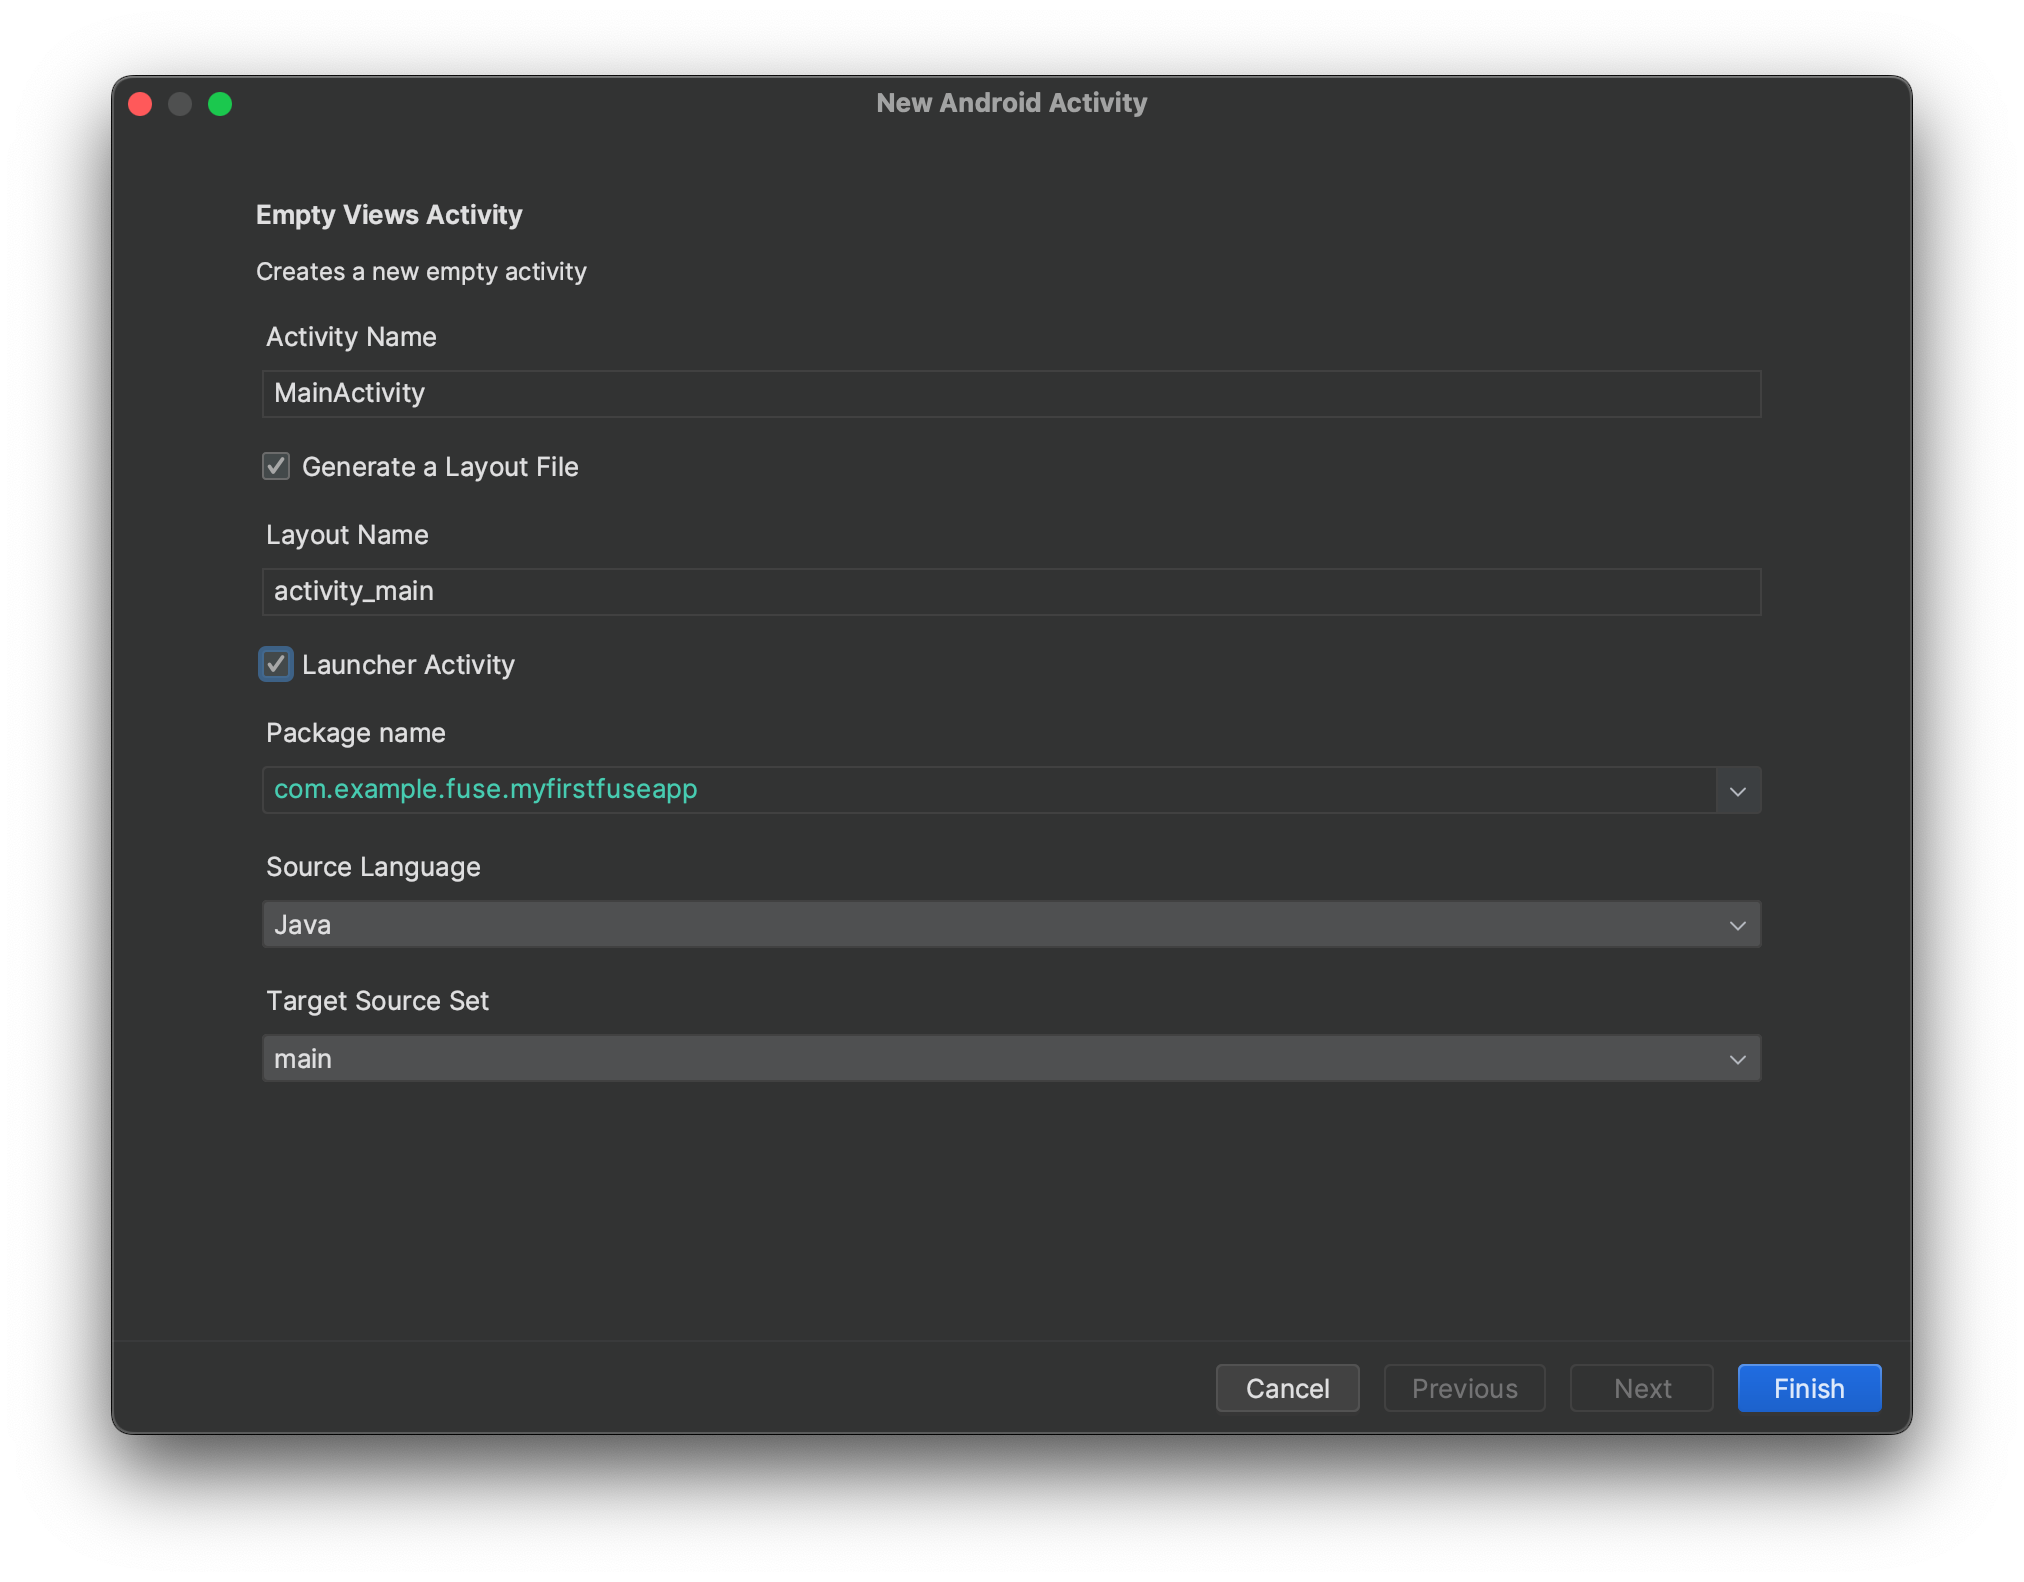
Right click on the app module, and go to New -> Activity -> Empty Views Activity. This will open a New Android Activity dialog.
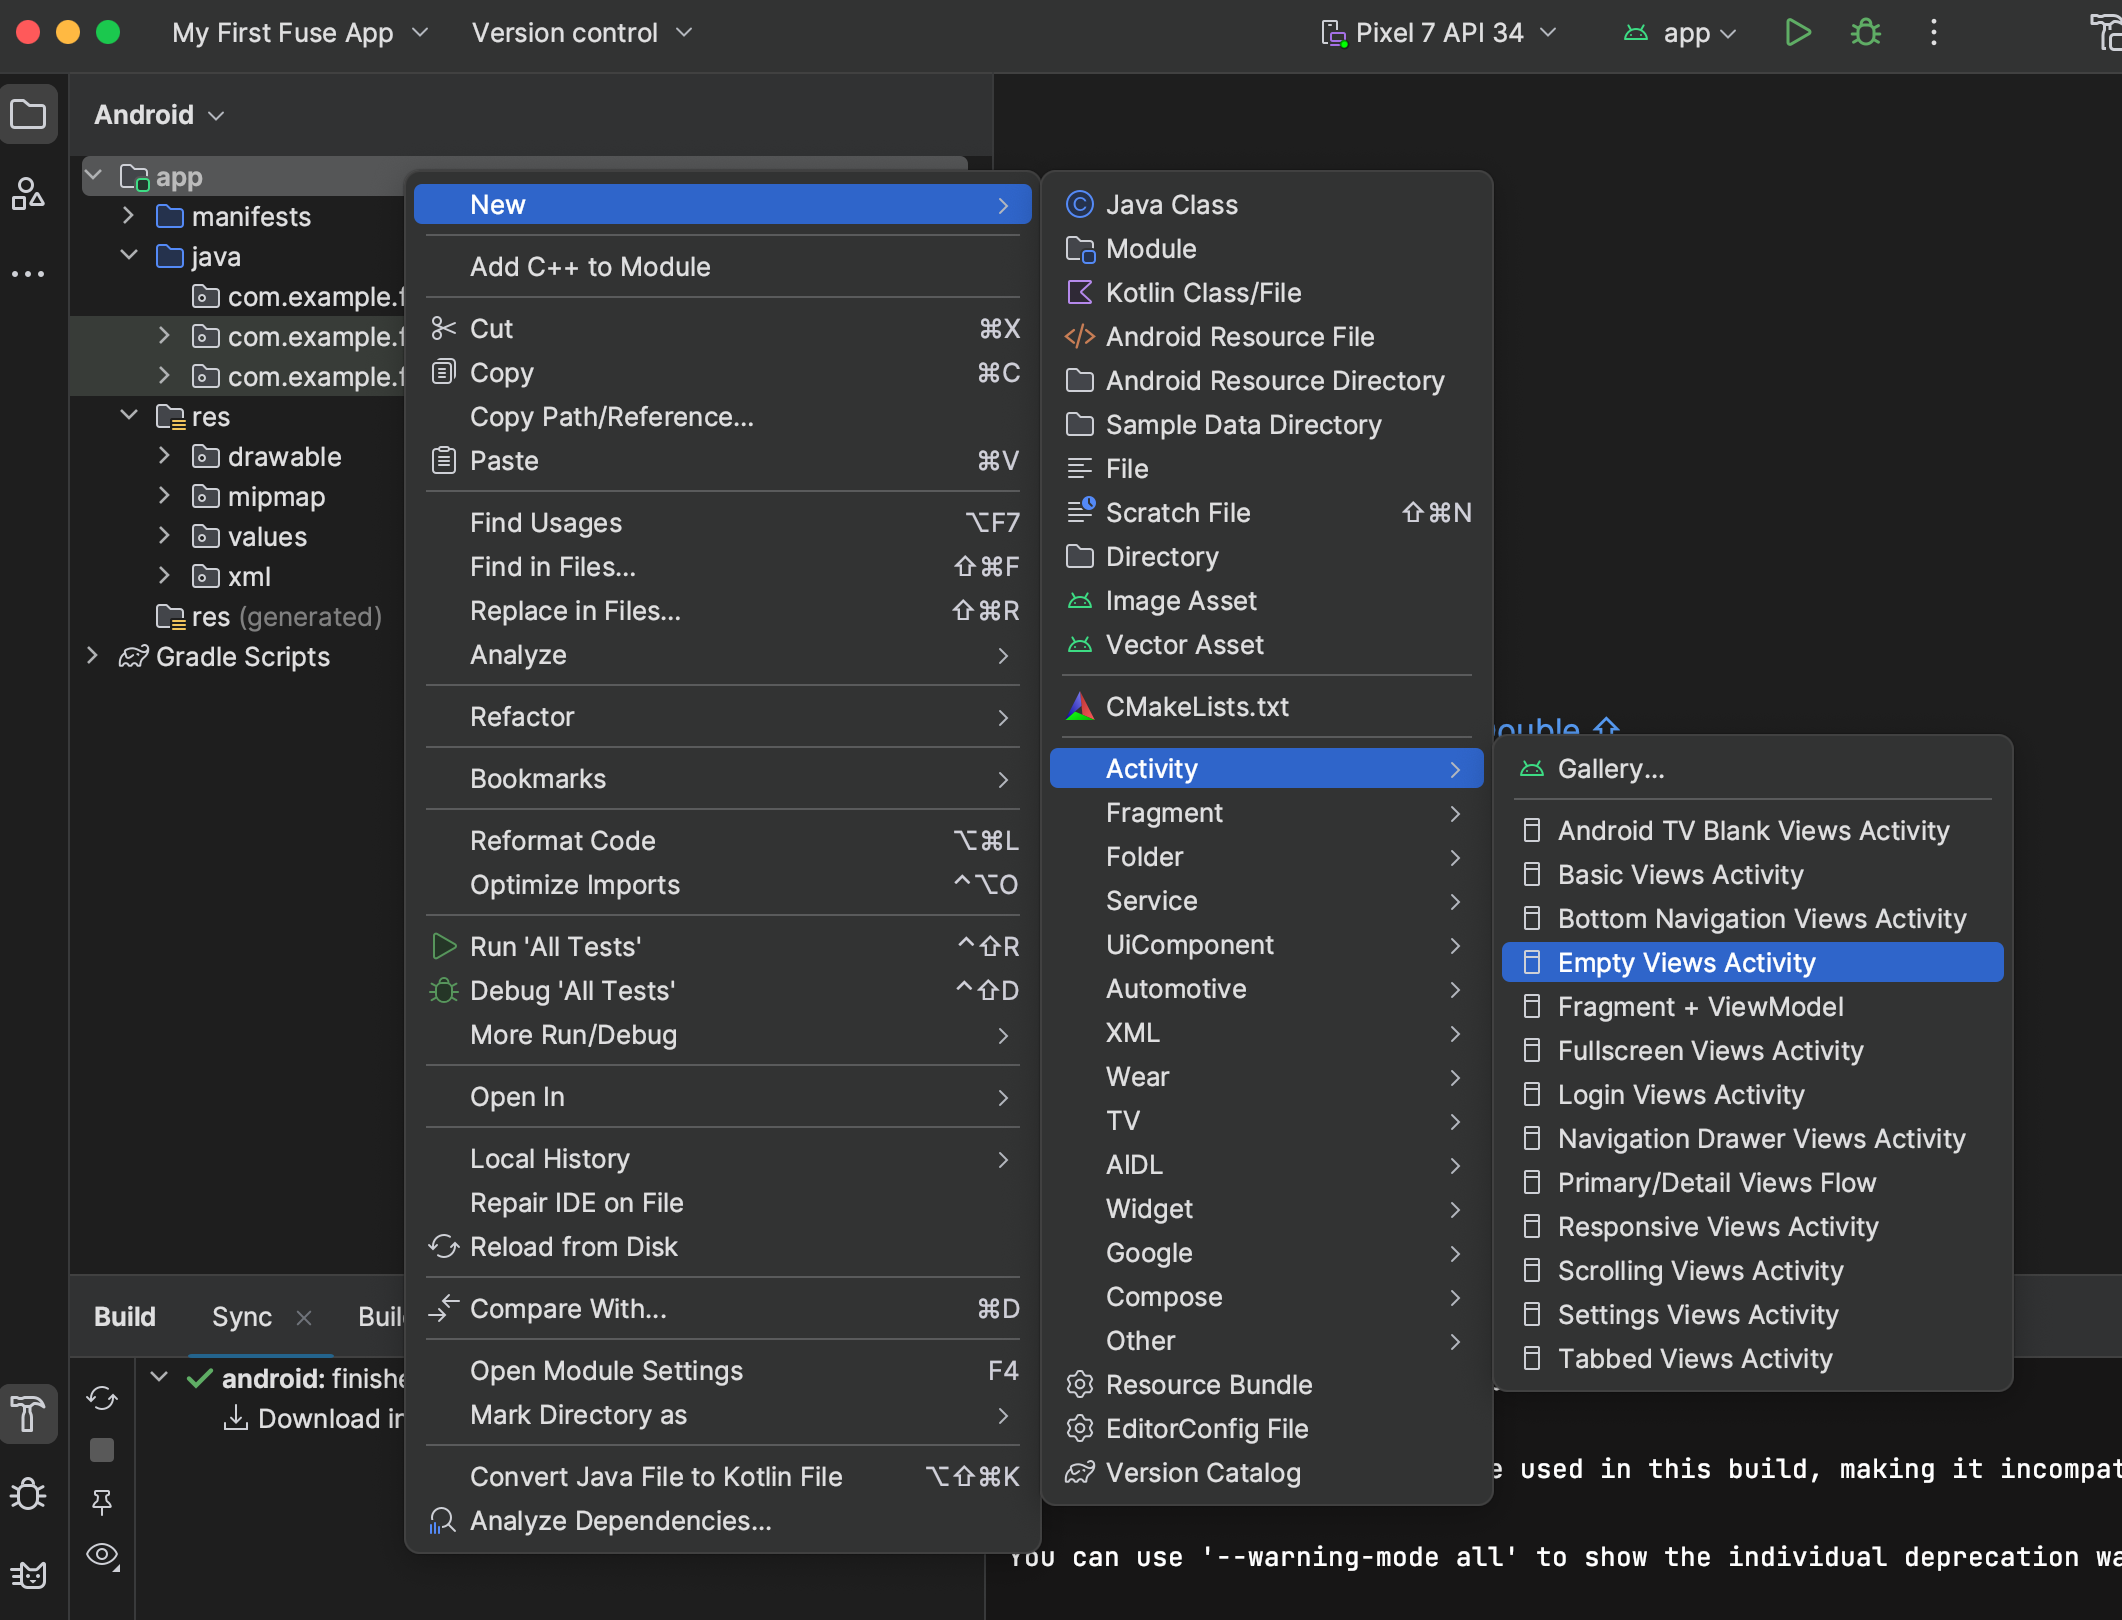
Check Launcher Activity because we want this activity to be the main activity, then click Finish
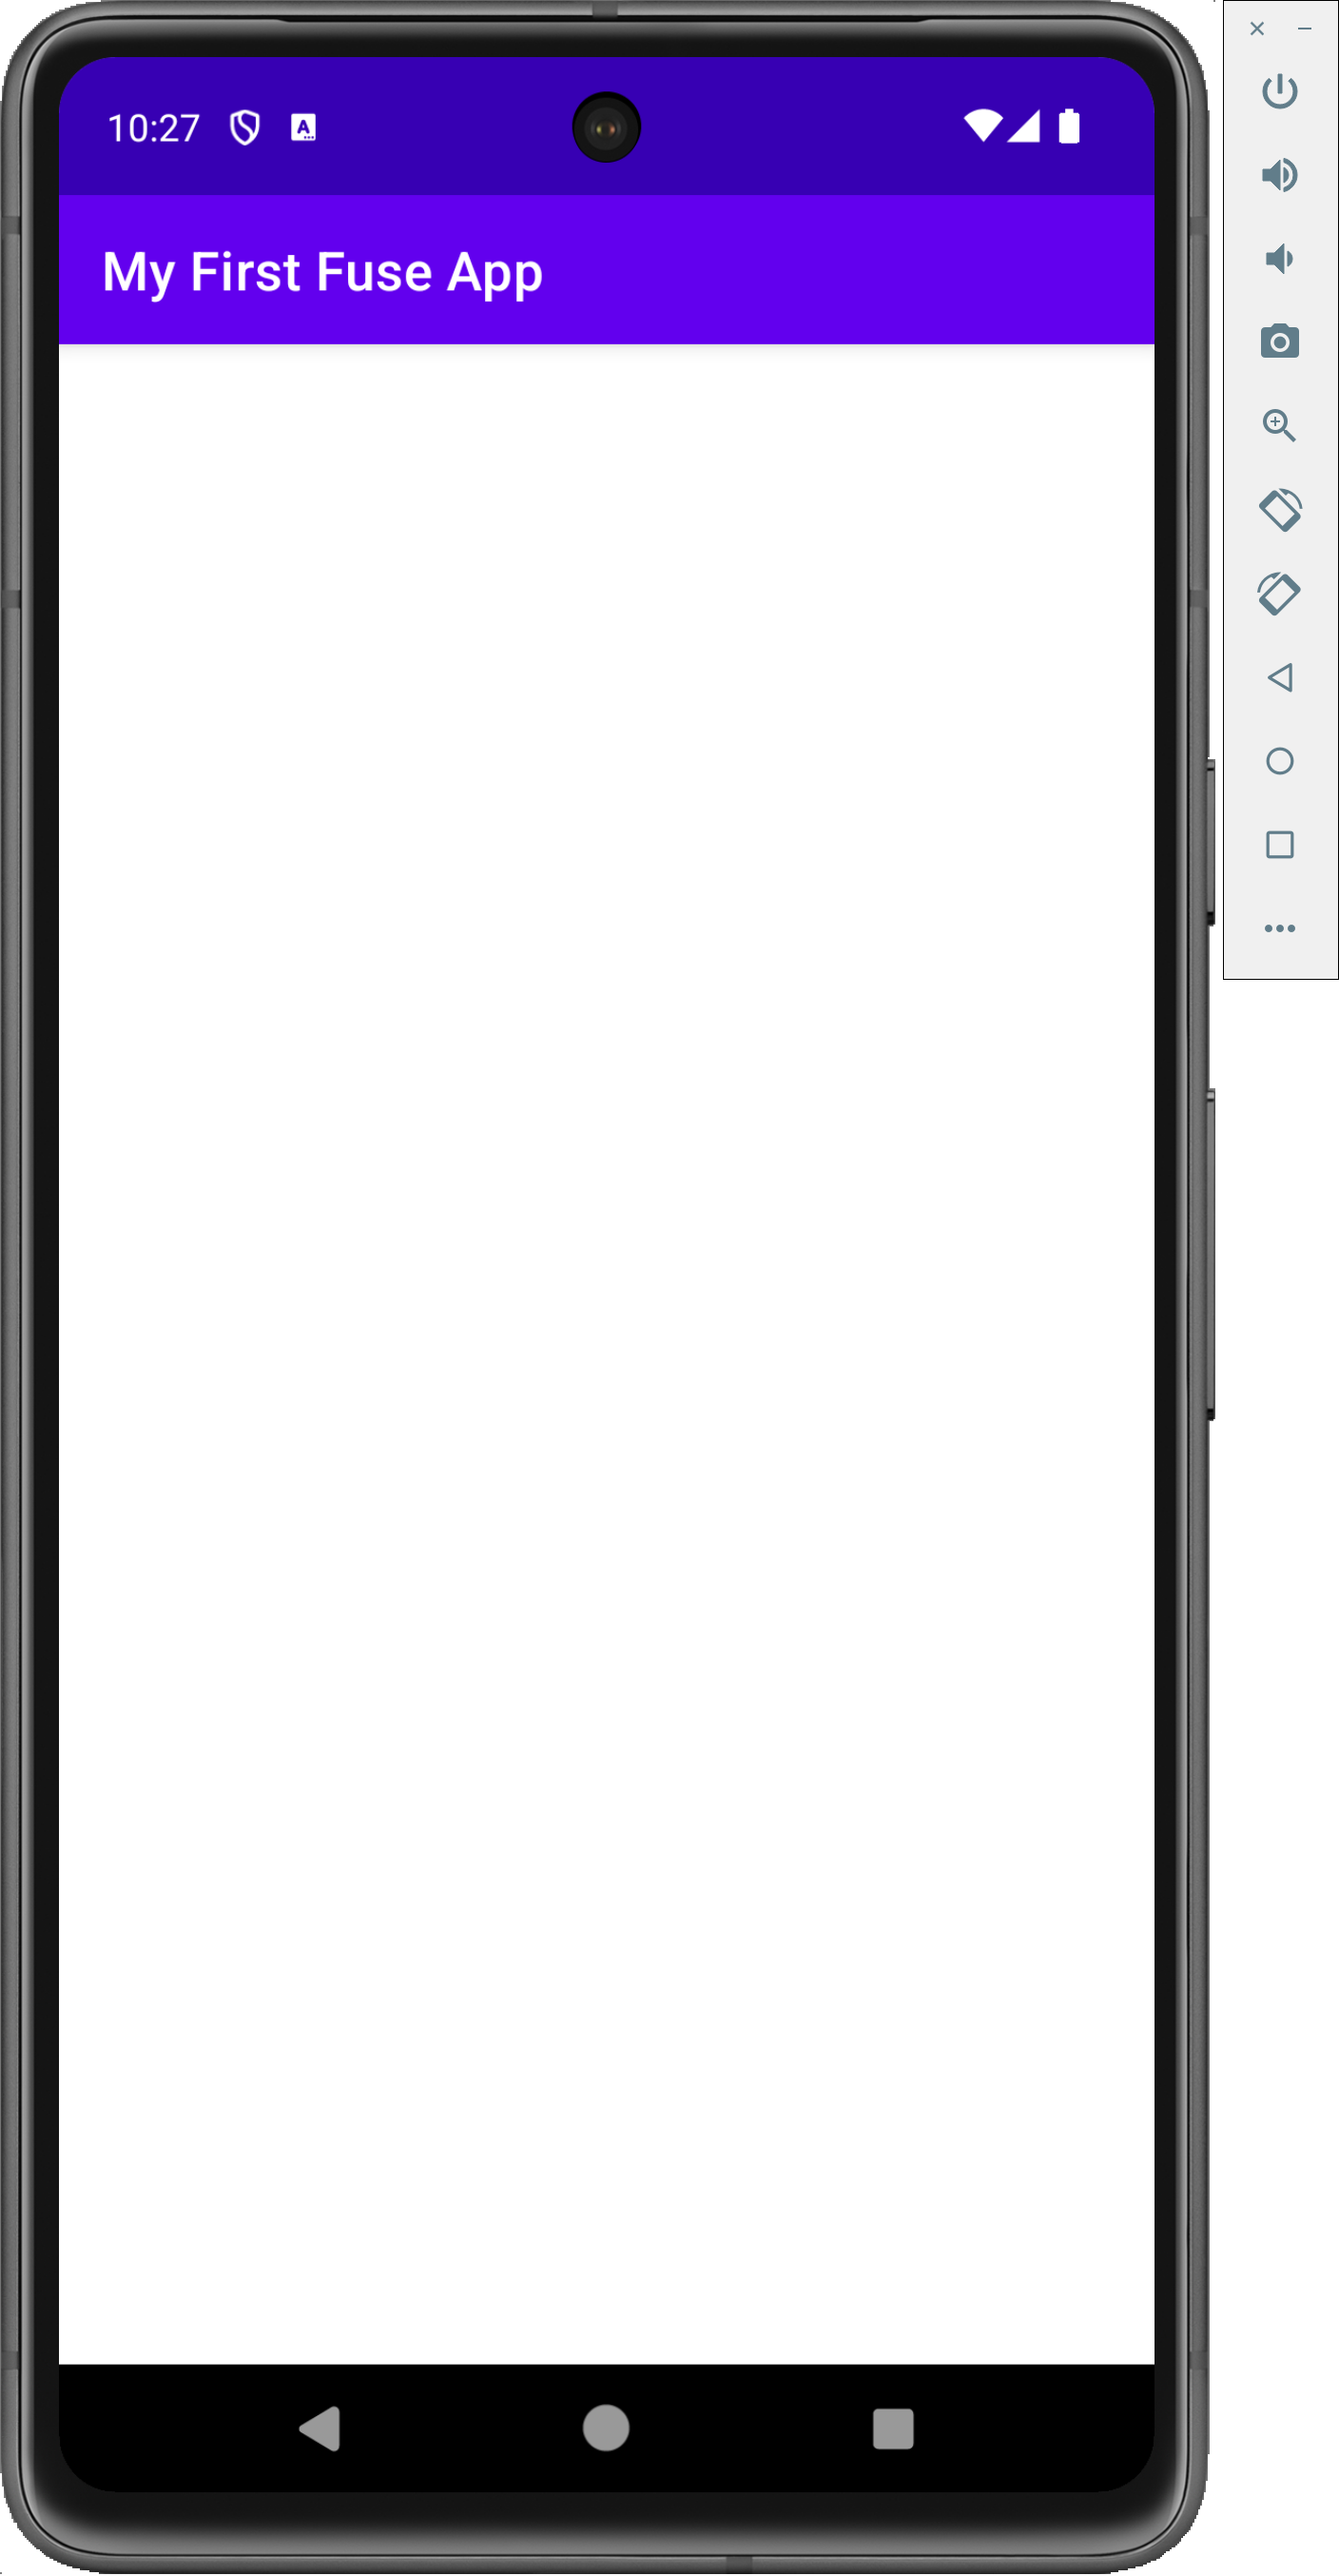
Now that we have a main activity, we can successfully build and launch our app.
Tip
If you don't want the "action bar", change your /res/values/themes/themes.xml to use Theme.AppCompat.NoActionBar as the parent.
Creating the asset folder
Like many apps, we probably want to bundle app assets. This is especially true for Fuse applications since most of our application will live in the webview, using the webpack-built JS and other web assets.
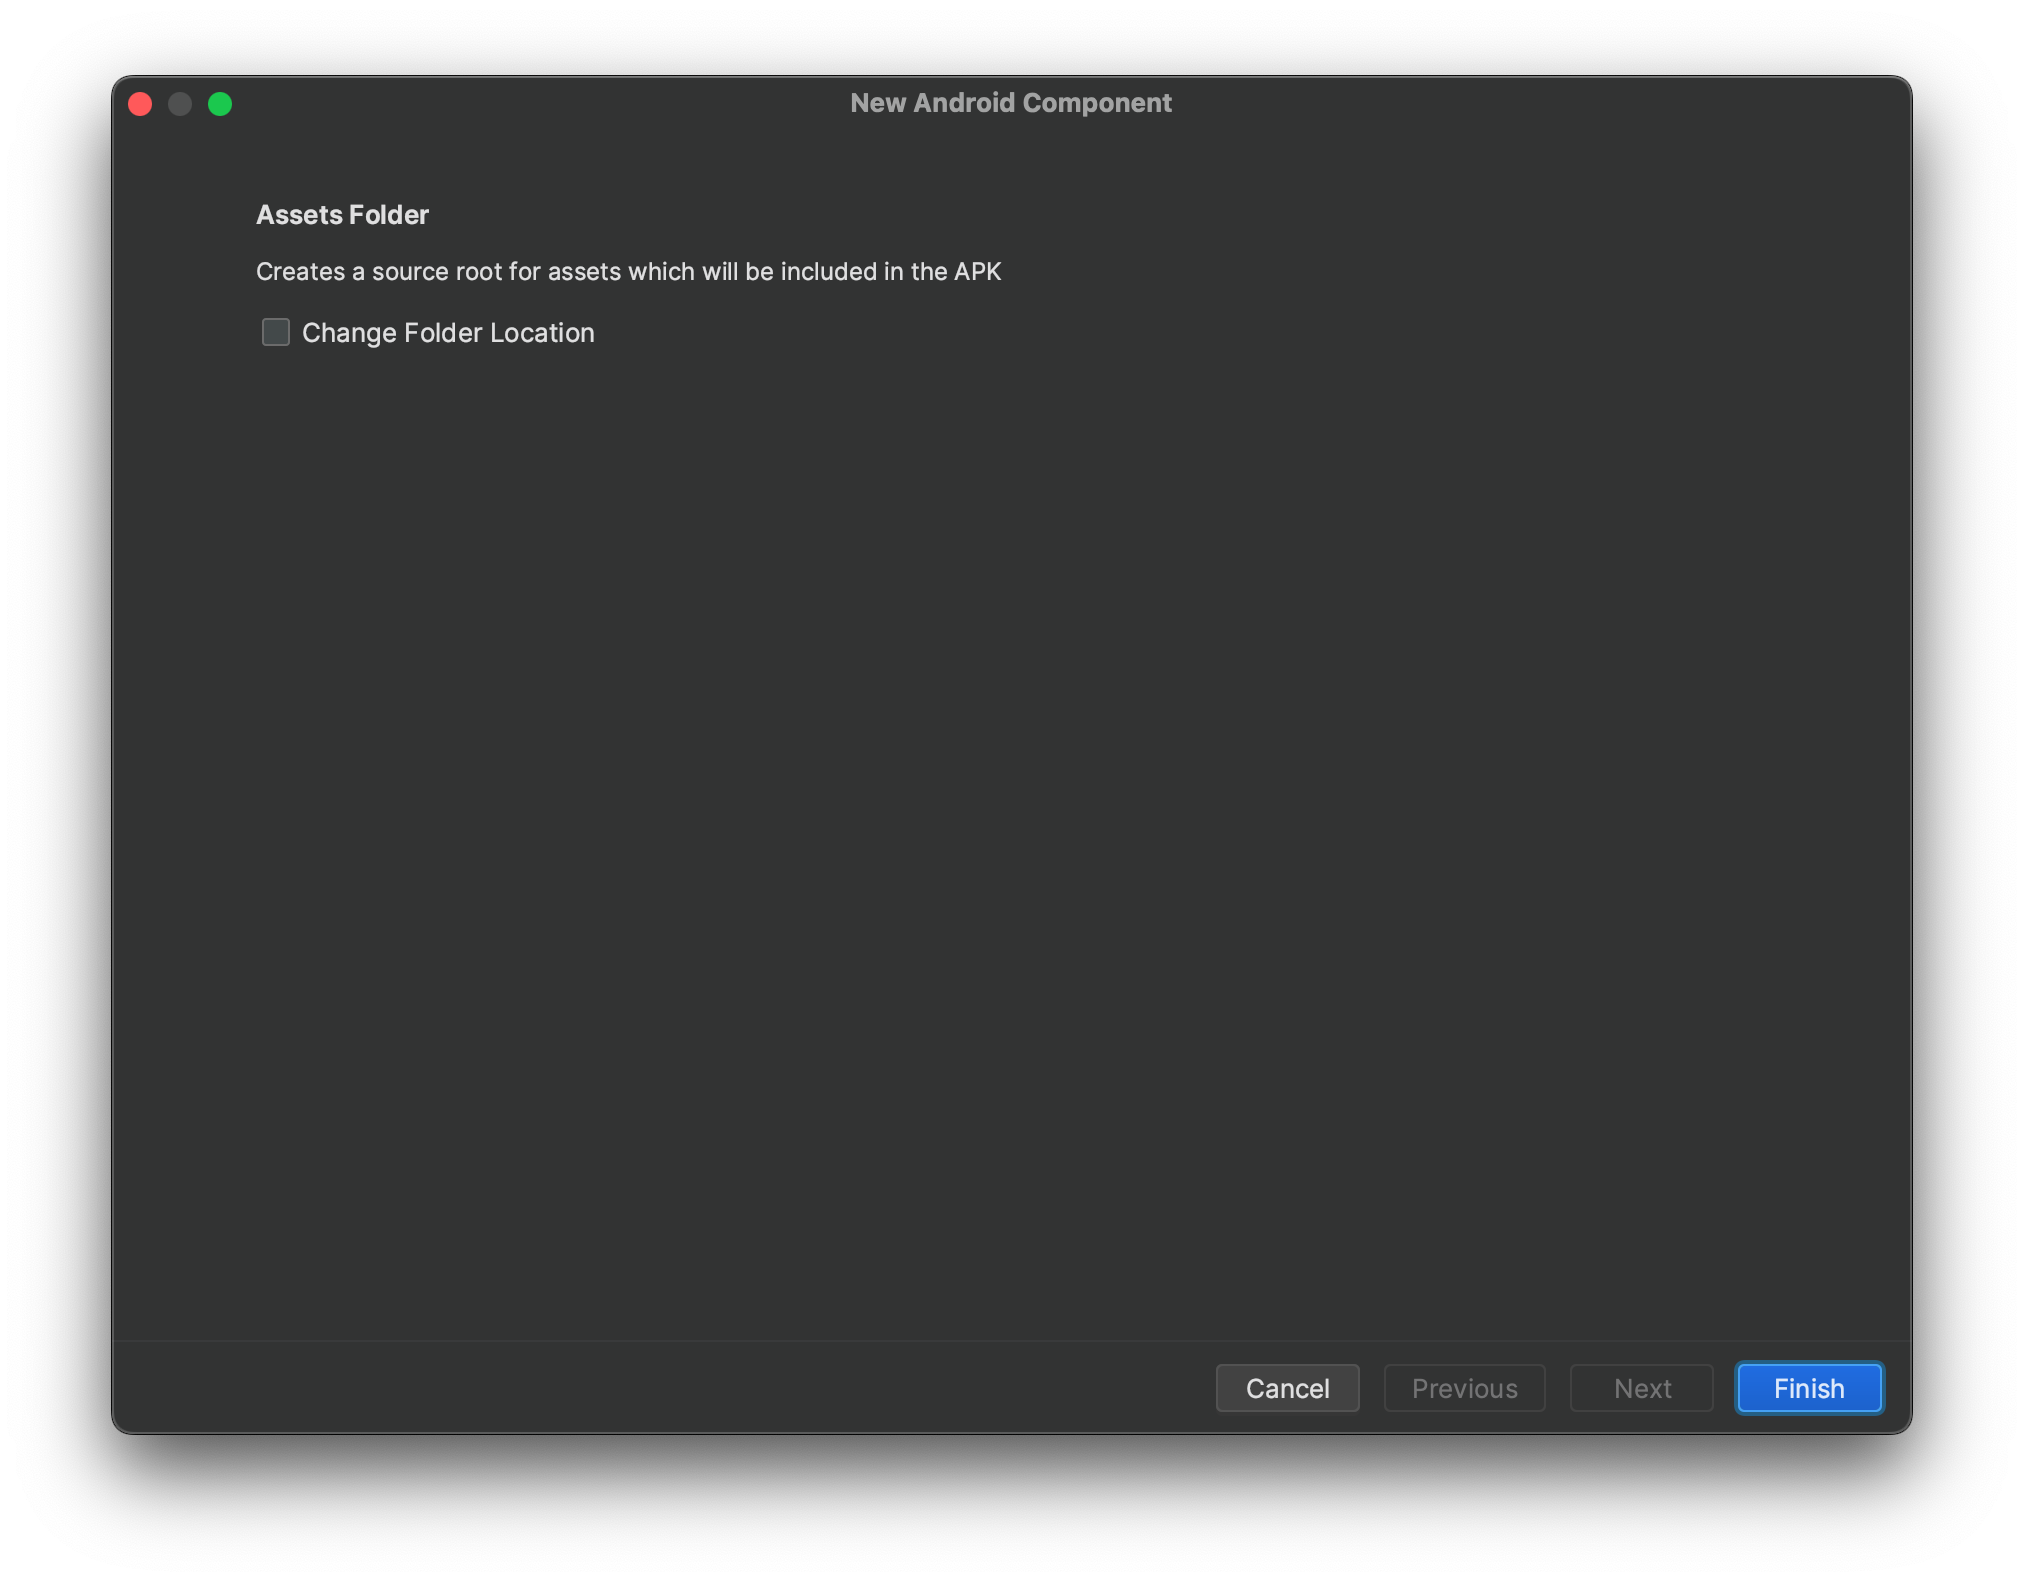
Right click the res folder and go to New -> Folder -> Assets Folder. This will open a New Android Component folder providing an opportunity to change the location, however we should keep the default location. Click Finish.
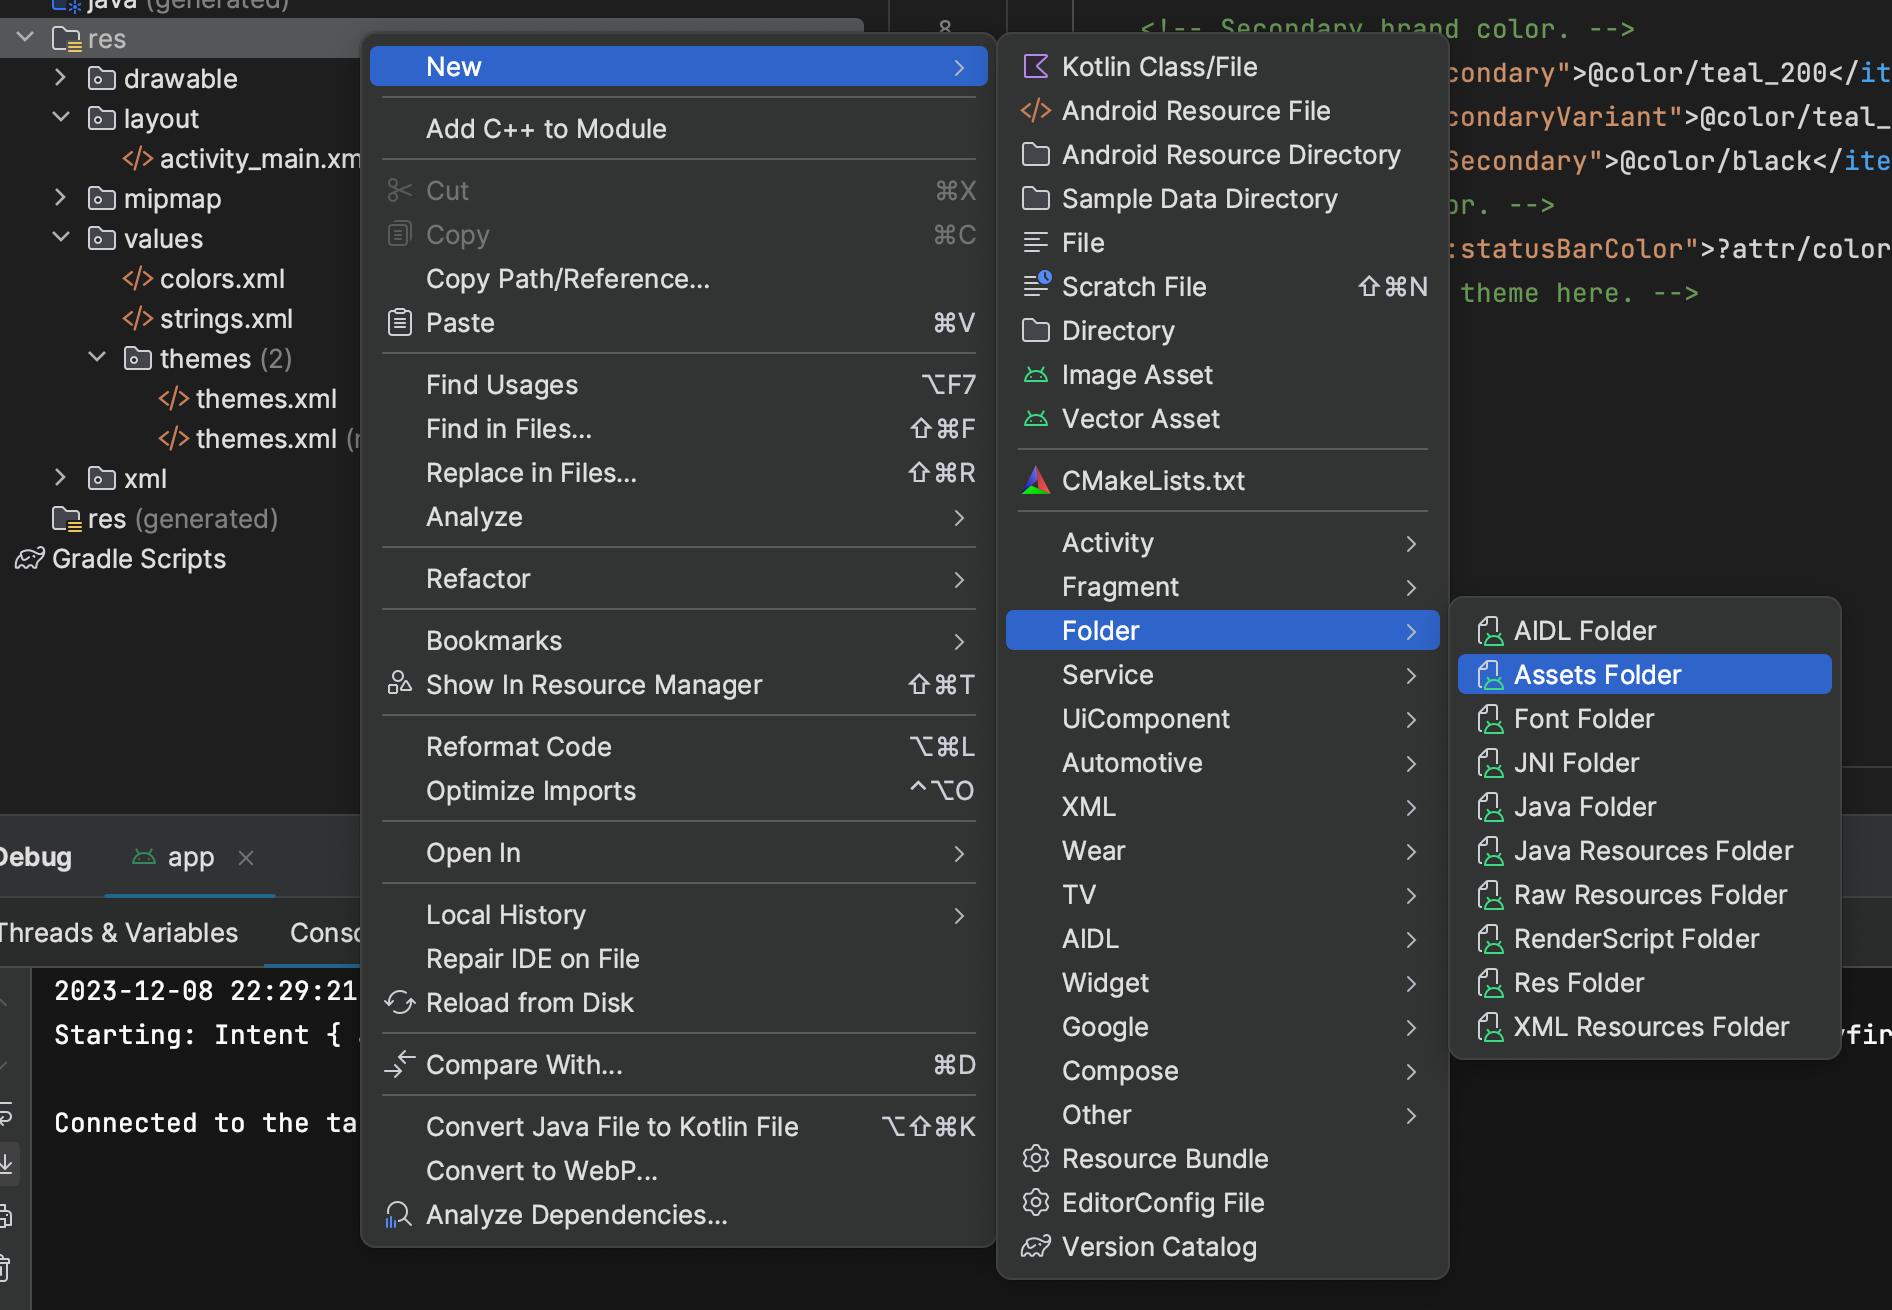
This will create a folder path /android/app/src/main/assets which will be used later in Webpack.
Preparing your Assets
Now it's time to build some build hooks that uses webpack to build your JS code, and deploy them into your assets directory. We will utilise a build hook in Gradle so that this process is part of your build process when building your Android project.
First however, when Getting Started we only built a base webpack config. We will need to extend that config for our android platform.
Android Webpack Config
Create a /webpack.config.android.js file with the following contents:
const Path = require('path');
const CopyPlugin = require("copy-webpack-plugin");

const config = require('./webpack.config');

config.output.path = Path.resolve(__dirname, 'android/app/src/main/assets/');
config.plugins.push(new CopyPlugin({
    patterns: [
        { from: "./src/index.html", to: Path.resolve(__dirname, "./android/app/src/main/assets/index.html") }
    ]
}));

module.exports = config;
This pulls from our main /webpack.config.js file and updates the output.path option which tells webpack to distribute any built files in our app's assets directory.
Additionally, we utilise a Webpack Copy plugin to copy our index.html file into our app's assets directory as part of the webpack build process.
Tip
There are multiple ways to skin a cat. The method shown here is just one way. Fuse is agnostic to these tools, as long as you can bundle your JS against Fuse's CommonJS codebase and provide an index.html file somehow.
Gradle Build Hook
Open up your app module's build.gradle.kts file:
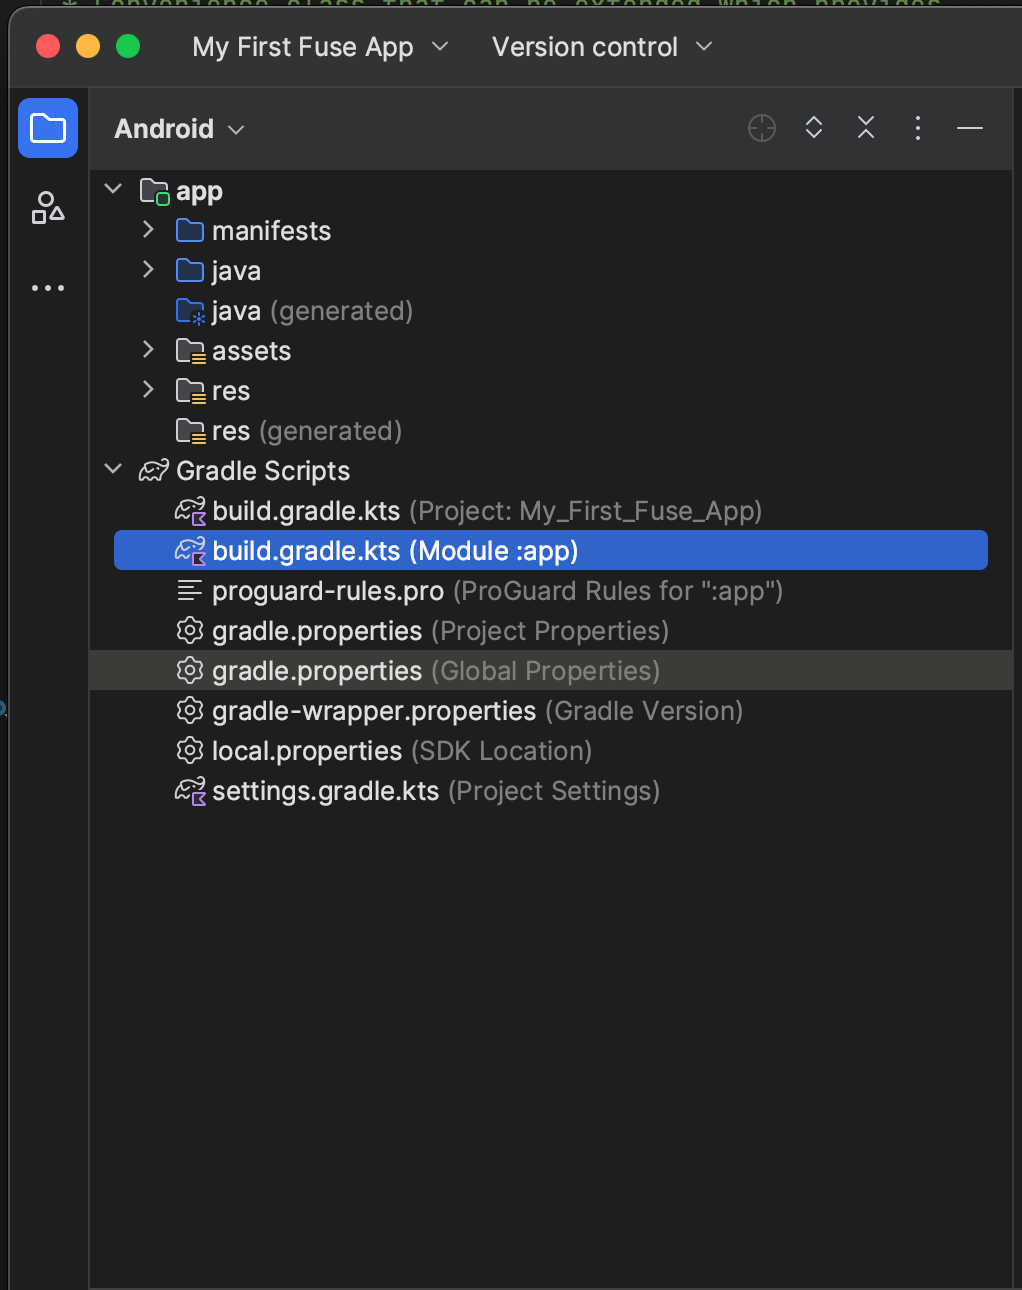
At the end of the file, add:
tasks.register("runWebpackDebug", Exec::class) {
    workingDir = file("../../")
    commandLine("npx", "webpack", "--mode", "development", "-c", "webpack.config.android.js")
}

tasks.register("runWebpackRelease", Exec::class) {
    workingDir = file("../../")
    commandLine("npx", "webpack", "--mode", "production", "-c", "webpack.config.android.js")
}

tasks.withType<Task> {
    when(name) {
        "generateDebugResources" -> dependsOn("runWebpackDebug")
        "generateReleaseResources" -> dependsOn("runWebpackRelease")
    }
}
We built 2 tasks, one for debug and another for release, which invokes webpack specifying the --mode and -c config file. It runs with a working directory 2 directories up, which should be the project root directory.
tasks.withType allows as to hook our tasks onto generateDebugResources task, which allows us to build and configure our assets directory before the build system packs them.
We can see this in action by making the project. Click on the hammer icon to simply build the app module. When it's finished, you should see index.html and js/app.js in your assets directory.
Note
While we now have scripts that sets up the assets directory, nothing is actually using them yet!
Adding the Fuse dependency
We are almost ready to start implementing some native code. But first, we need access to the Fuse android framework.
Fuse is shipped through Breautek's Nexus Server. We will need to add this as a repository.
Open the settings.gradle.kts file and modify the dependencyResolutionManagement -> repositories block.
repositories {
    google()
    mavenCentral()
    maven {
        url = uri("https://nexus.breautek.com/repository/android/")
    }
}
Now we are ready to add the fuse dependency. Open the app's build.gradle.kts file (the same one we modified earlier) and inside the dependencies block, add:
Tip
Check Nexus or GitHub Releases for the latest available version.
Sync your IDE with gradle to get intellisense.
Implementing the Main Activity
Earlier we created a main activity, but we didn't actually implement anything yet. Now that we are importing the Fuse framework, let's start implementing our activity.
Let's open our MainActivity.java class and replace the contents:
package com.example.fuse.myfirstfuseapp;

import android.os.Bundle;
import androidx.appcompat.app.AppCompatActivity;

import com.breautek.fuse.FuseContext;
import com.breautek.fuse.FuseFragment;
import com.breautek.fuse.plugins.echo.EchoPlugin;

public class MainActivity extends AppCompatActivity {
    private FuseFragment $fuse;

    @Override
    protected void onCreate(Bundle savedInstanceState) {
        super.onCreate(savedInstanceState);

        setContentView(R.layout.activity_main);

        if (savedInstanceState == null) {
            $fuse = new FuseFragment();
            getSupportFragmentManager().beginTransaction().add(R.id.fuse_fragment_container, $fuse).commit();
        }
        else {
            $fuse = (FuseFragment) getSupportFragmentManager().findFragmentById(R.id.fuse_fragment_container);
        }

        if ($fuse == null) {
            throw new RuntimeException("Fuse Initialization Error");
        }

        $fuse.setOnReadyCallback((Bundle fuseInstanceState) -> {
            // Fuse is ready here
        });
    }
}
Here we create an AppCompatActivity, which creates and holds a reference to a FuseFragment. This fragment sets up the core fuse environment. If we have an instance state, the state can be recovered.
Finally we use setOnReadyCallback which will be invoked on the main thread once Fuse is ready to be used. This is an ideal time to register native plugins.
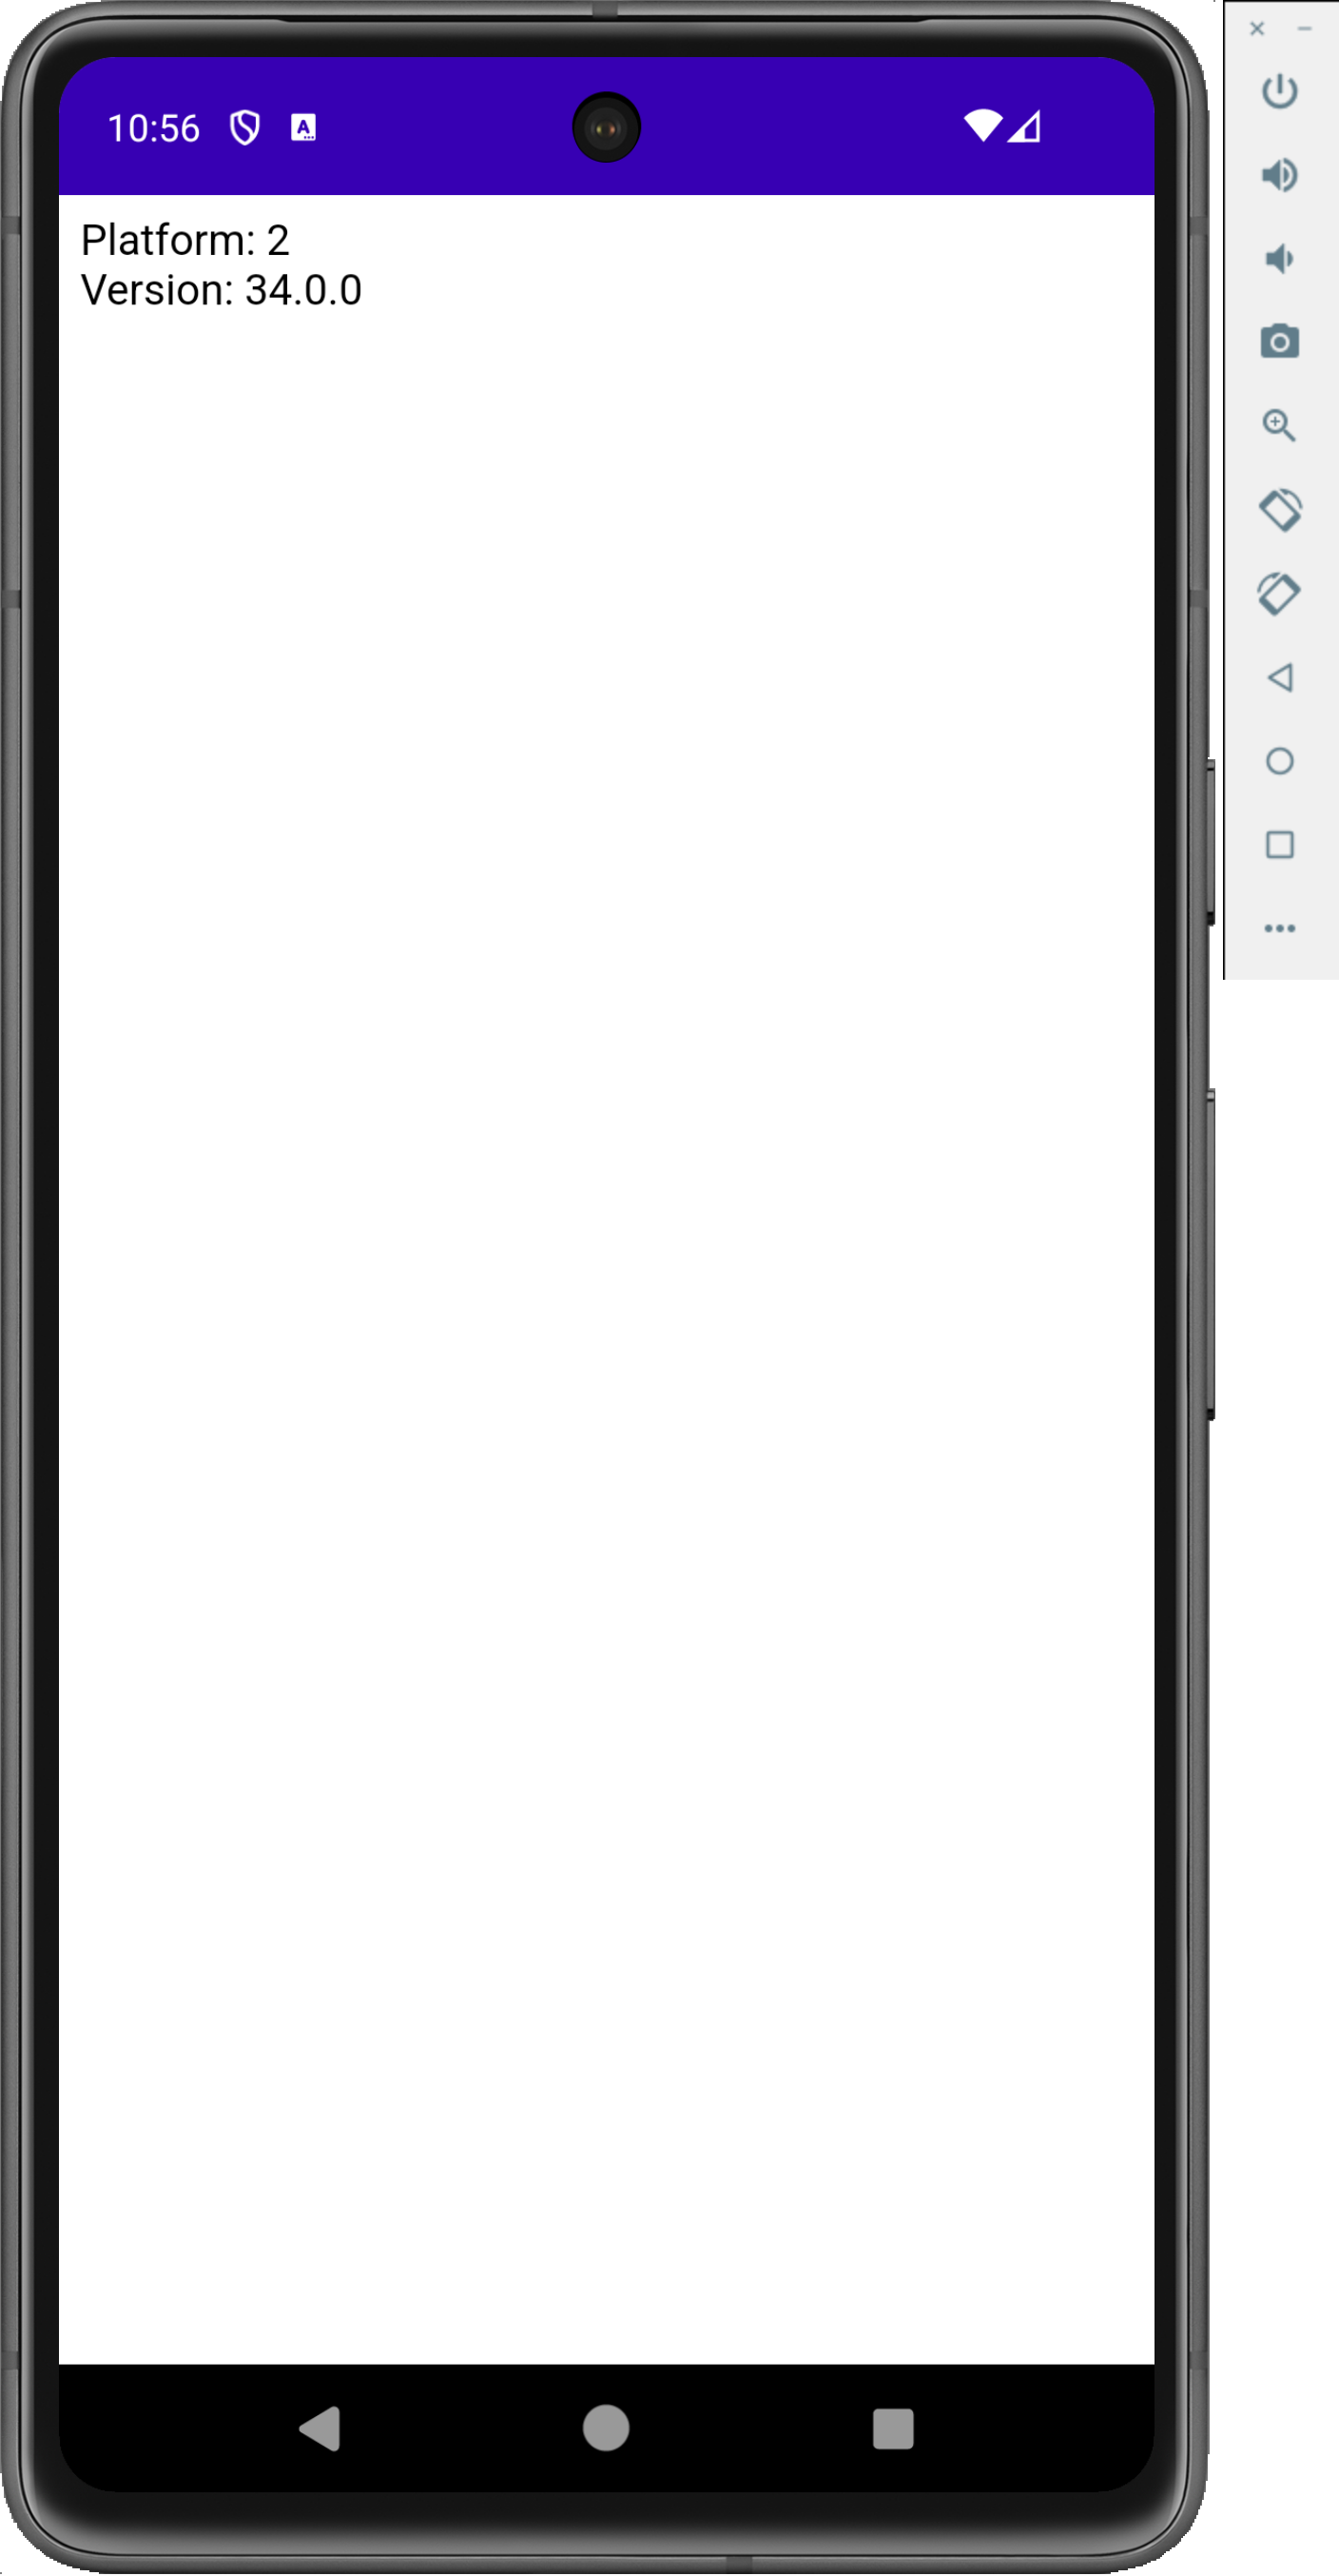
This is the bare minimum needed to launch the app. The FuseContext contains the Webview instance and will setup the content view. Running your app now should produce a screen that will contain Platform: 2 which is a constant value for the Android platform, as well as the Android version.
Note
In the app, you'll see a SSLHandshakeException for SSLV3_ALERT_CERTIFICATE_UNKNOWN. This exception can be safely ignored, it is a side effect of Fuse framework using self-signed certificates. This error will be silenced in a future release.
If you've made it this far, congrats! We now have a Fuse project in a state where you can build an application using standard webview technologies.
Integrating Fuse Plugins
Restricting yourself to just browser features however can be rather limiting. So we can incorporate Fuse Plugins that extends the functionality available using the embedded API server as a communication channel between the webview and native platform environment.
Generally speaking, a fuse plugin will offer API endpoints which will do tasks on the native platform using native device APIs and then will return a response back to the webview. If you're familiar with REST APIs, this is akin to having the webview (frontend) client making a REST API request to a backend server.
Unfortunately, this section isn't complete yet!
TODO - Come back to this when we have a simple released plugin available that we can use for demonstrating purposes.
Writing App Tests
TODO
Distributing your Application
TODO